


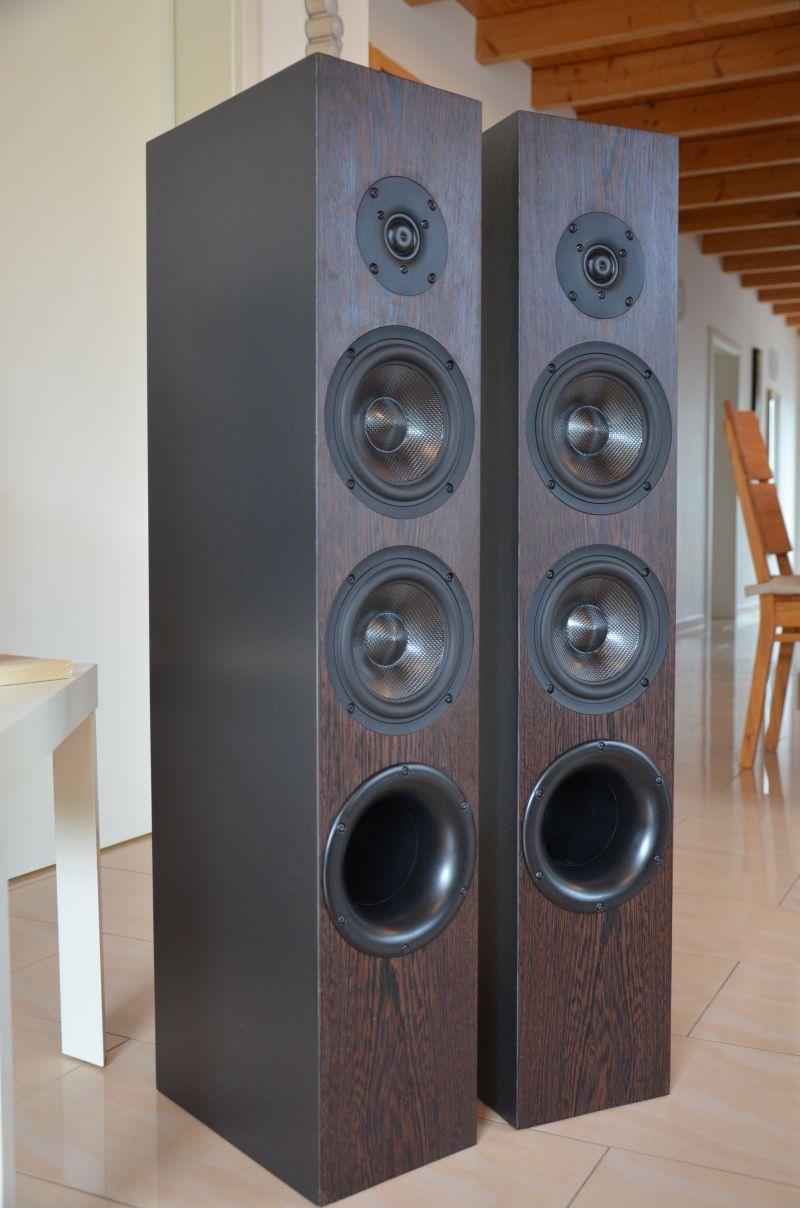
Beatclub Base – audiphile power floorstanding speaker
The speakers really pack a punch and still sound very balanced. The bass is crisp and without a doubt, the brilliant, very lively high frequency of the ring domes is a highlight of the Beat Club Base. As a background PA system, the Beat Club Base plays pleasantly and unobtrusively. However, it becomes really dynamic from a slightly higher room volume in a large room. Here, a room-filling sound firework can be heard that inspires. The base plays audiophile from electro to classical almost everything.Curious now? Read the detailed building reports.
The modern art of Beat Club
1st box
Beat Club Base stereo and home theater floor standing speaker box on slim base.
2nd box
Beat Club Soloist (Rear) with rear tweeter as stereo speaker or home theater team player.
3rd box
Beat Club Double (Center) as center or home theater front - Atmos says hello.

Beat Club - a new development!
Sure, every kit is newly developed and yet "copy and paste" is sometimes used, since new developments are often supposed to build on proven concepts. Certainly, one could settle on a usual baffle width of 23 cm because it already sounds quite good, but we wanted to build slimmer this time. It would have been most convenient to just let a hard-diaphragm driver play and then say: This is a hard diaphragm, it sounds a bit unpleasant in certain frequency subranges, that's just the way it is. The same applies to the tweeter. If installed in an unfavorable way, even a high-quality tweeter will not sound well balanced, but more on that later.
So, for once, we completely freed ourselves from the usual constraints of loudspeaker design:
The goal was a home theater set packed into small, space-saving cabinets with level stability suitable for parties and audiophile stereo sound. In addition, these cabinets should be very simple in design, without complicated flourishes such as chamfers on the cabinet edges, as well as symmetrical and in the comparatively thin standard material of 18/19 mm thickness. With this approach, all parameters must be optimized. Here it is not necessary to borrow from existing designs.
Woofer SB 17CRC35

As woofers, we have chosen the SB CRC for this purpose. These are ideal for this application:
Balanced in frequency response, extraordinarily level stable for the size and also child-friendly robust. The CRC drivers consist of the familiar SB aluminum-cast baskets, but with a sandwich cone made of carbon fiber composite. The surrounds are rubber with no noticeable surround resonance, as most designs of this type unfortunately exhibit. Pronounced diaphragm resonances are normal with such materials and yet rarely a problem sonically. We are thrilled by the sound of this driver, which in its all-around balanced performance is reminiscent of much more expensive drivers and sounds even a bit softer than the very inexpensive NRXC drivers. The drivers are sonically most comparable to metal diaphragm drivers, perhaps a shade softer, but much more detailed playing than drivers with polycarbonate diaphragm. This makes them the ideal choice for the Beat Club lineup.
Tweeter SB29RDC

Most tweeters were eliminated due to low level, lack of usable frequency range or too much frequency response ripple. This left the Ringdome SB29RDC as the price-performance winner. This tweeter, whose fabric diaphragm borrows from the more expensive Satori models, is already a real acoustic treat in its entry-level version. Not high-end and yet super balanced, so that this tweeter harmonizes sonically excellent with the excellent woofers. These initial components and objectives are the basis from which the Beat Club was created.
And here we are already at the topic of the high frequency range
The tweeter's position on the baffle of the loudspeaker has a decisive influence on the high-frequency reproduction. An unfavorable position leads to a wavy frequency response both on axis and at listening angles deviating from the center axis, so that the high-frequency range is not emitted evenly but fragmented into the room. This effect is caused by the diffraction of the sound at the cabinet edges and the frequency-selective directional cancellations due to interference, i.e. mutual amplifications and cancellations of the direct sound with its reflections. For a rough evaluation of the effect and selection of favorable proportions, appropriate simulations are carried out. This preempts numerous new enclosure designs with extensive series of measurements. There have been metrological analyses on this subject for decades, as well as attempts to represent them in models as a practical approximate solution.
The Beat Club has a very narrow cabinet width of 18.5 cm. Placing the tweeter 10 cm from the top (relative to the center of the tweeter) would be visually pleasing, but acoustically unpleasant. The presence range is radiated into the room in such a fragmented way that there are only a few sweet spots, i.e. places of balanced sound quality, and by no means a uniform omnidirectional sound. Consonants will also sound rather sharp due to frequency-selective accentuation. Only below about 14 cm from the top of the baffle does the frequency response become reasonably balanced. This doesn't look particularly good, but sounds heavenly. This would be the ideal design for home theaters or for those who love technical purism.
What is a viable alternative?
The starting position is an 18.5 cm wide baffle with a distance of the tweeter 14 cm to the upper baffle edge. The best solution here is a 2 cm 45 degree chamfer on the left and right of the tweeter as well as on top, with all drivers placed 3 cm higher. So 18.5 cm wide with 2 cm bevel each at tweeter height and distance of tweeter 11 cm from top, again minus 2 cm bevel.

From a theoretical point of view and also proven by measurements, the variant with oblique chamfers and chamfer on the upper edge is quite ideal, since there are hardly any symmetries this way. Thus, the right variant is still somewhat more balanced than the left one.
The baffle simulation shows that only a few geometric combinations would be ideal, but here the boundary conditions of the simulation must be taken into account, since it calculates at an angle and does not evaluate the baffle circularly at small angles with averaged results. Therefore, the dimensions presented here are to be evaluated as "favorable" without claiming that these are the only good sounding variants.
A lateral displacement of the tweeter also has similar effects. In this case, the tweeter is usually shifted outward in the stereo setup.
A lateral displacement of the tweeter from the center axis by 1.5 cm results in a good radiation behavior laterally without chamfer (an edge refraction of 5 mm is acoustically insignificant) and distance of the tweeter 11 cm from the top with 2 cm chamfer. Rounding the bevels of the front results in large radii that hardly differ acoustically from a front with bevel.

The view of the speakers is also shaped by the woofers, here a moderate to small distance between the drivers is advantageous for a homogeneous sound image.
A bass reflex tube on the front - as it is installed in the two front speakers - is basically not ideal for ultimate high end, but for maximum bass feeling. Therefore, the sample front speakers get huge jet BR tubes with granite finish and angle. This is the maximum that is acoustically feasible.
Both the shape of the jet funnel and the paint with rough surface serve to reduce the flow resistance in the bass reflex tube. B&W writes quite a bit about this - it's the same fluidic optimization as the golf ball, a slightly rough surface is supposed to reduce drag. Of course, such an effect is only effective at high bass levels, since at low levels hardly any air is moved.
The angle in the bass reflex tube also has its function: 1. the inner port is closer to the drivers and 2. the mid-highs are somewhat reduced in the angle by back reflection.
For all aesthetes: You can also order a normal HP-100 tube instead of the jet tube.
If you want to banish the reflex tube to the back, you will find an ideal place on the height between the two woofers.

The bass reflex tubes of the Center Double and the Soloist are installed at the bottom. This orientation has the great advantage that the speakers can be placed very flexibly. Again, it is clear that the arrangement of the bass reflex tubes on the back is possible, but for a center, which is usually in front of the wall, the side arrangement may also be suitable.
Another benefit of the cabinet: the floorstanding and rear speakers are based on a basic dimension of 18.5 cm x 30 cm. With such a narrow cabinet, the drivers rest on the walls, so the mechanical forces are almost ideally absorbed by the cabinet and vibrations of the cabinet are reduced accordingly. Due to the greater depth, the cabinet is acoustically more stable in relation to the direction of movement of the diaphragm. As a result, even a thin-walled cabinet made of material only 19 mm thick sounds very good.
And why does such a small volume work? Quite simply, it requires a very good bass driver with exceptionally low free-air resonance and a rather heavy diaphragm. That combined with a strong driver allows for intense, full and perceived deep bass even in an old-school tuning with steeply dropping bass below 70 Hz. The advantage of such a tuning is undoubtedly the very high level stability, which pushes the drivers to their performance limits without them falling into uncontrolled oscillations. Such a tuning often sounds harsh and has a tendency to sound tinny. With the Beat Club, we were very surprised at how round and rich the bass sounds.
Such a set-up is ideal for a home theater, but if you need a vibrating sofa for watching movies and TV, you can add a subwoofer. All others who only want to listen to music and simply watch movies will certainly not miss anything. In fact, there is little music material that contains a pronounced low bass as an essential element. Such musical material is only reproduced by a few speakers anyway. A bass drum, for example, is still reproduced acoustically by the speakers; only when it comes to electronically generated low bass does it get quiet in the frequency basement.
The rear speaker is designed as a dipole. In a home theater system, the rear speaker is supposed to fill the room with sound from the sides and the back, and not necessarily just concentrated in one place. Therefore, dipoles that sound evenly around the room are superior to normal speaker designs for this application. In addition, it is advantageous to move the rear tweeter sideways so that the diffraction at the additional rear baffle, i.e. at the speaker cabinet itself, is more balanced.
Since the rear speakers are usually placed close to the wall, their efficiency is 3 dB lower than the other speakers in the surround system. This makes it possible to use the speaker set directly on the home theater amplifier without any leveling of the individual speakers.

And now it's briefly about the subject of crossovers. These are kept very simple in all Beat Club speakers and have only a small, but not insignificant finesse. The sophisticated crossover circuit in front of the woofer is there so that the mid-frequency membrane resonances are maximally lowered in level and thus significantly reduced. With this simple circuit trick, even a hard diaphragm chassis sounds pleasantly soft. The hardness, which is said to ceramic, but also aluminum chassis, is primarily an immature crossover circuit without consideration of these membrane resonances.
The Beat Club Base from Jörn
Report from von Jörn

Hello loudspeakerbuiling team,
enclosed are a few pictures and feedback on the BeatClub Base I built last year. I chose oiled birch multiplex (18mm body, front in 21mm) with the alternative front with the beveled phases for the HT.

I must say that after more than 12 months I am still very convinced of the "big" Beat Clubs. Pleasantly slim, they can be integrated very well into a "normal" living room and yet come with a really big sound at the same time.
The bass is really amazingly sovereign and precise, even at higher levels. At the latest here you notice that there is quite a bit of reserve. Overall, they are very balanced and can really be "heard through" well.
Nothing sounds sharp or unpleasant here, no matter where you place yourself in front of it, nothing is glossed over or even smoothed out here!
Many old MP3s from the last millennium and from the beginning of this millennium with rather poor encoding or even current streams with too low bit rate but pretty quickly exposed as what they are: sound residual ramp that unfortunately only rattles and rings with artifacts.
With good material from CD, record or even with higher-resolution/compressed streams/MP3s, the speakers are then really in their metier. Modern rock / metal (Tesseract, Architects, Bring me the Horizon) and also electronic music (Lorn, Robyn, Phantogram and many more) or but also excellent mixed "Eighties" (Peter Gabriel, The The, Grace Jones) come on these boxes actually absolutely outstanding!
Also for home cinema, they provide with the appropriate soundtrack and especially with the support of a subwoofer (in my case, one that has been around for a while) for a downright shattering bass foundation and with various effects for a really very neat kick.
Even if you have to say that the subwoofer itself really does not come too much deeper than the BeatClub Base itself.
If a little less "rumble" and "depth" is enough (or wants; or may), the front speakers alone should be enough for you, guaranteed!
The subwoofer is not needed for music at the latest; on the contrary, it is usually too much of a good thing.

Beat Club - Base
Report from Damian
If one sits practically only at the PC to work and in addition still Corona any past leisure activities denied, one must reach evenly to other things.
Since I built my first DIY speakers with the Mark 8 and 9 (with Markaudio drivers) and had a lot of fun with it, I wanted to dedicate myself to a new project, which should reach the next level in terms of sound. The Beat Club towers seemed like a good project between work and child.

The initial plan was to build the Beat Clubs with a concrete-look body and walnut-wood front. But because of Corona the wood availability is running out and the Chinese market is currently buying up everything, it became a pure concrete-look project.
Starting with black colored MDF (which I didn't order) I first glued the sides and the back and then added missing material and sanded too much. The front I tried to work on by means of Dremelfräse and compasses. At this point, my personal opinion is: a Dremel actually serves this purpose very poorly, or I got a Sunday machine. Twice the compass came loose and the bits broke.
Can't have everything running smoothly. But that did not stop me from continuing. Then it went on with a real router from Bosch, with which I rounded the upper edges of the body (personal optical preference). Afterwards everything as well as it was possible with MDF filler filled! So that it dries cleanly, small layers were always applied and sanded so that everything also adheres and does not crumble away.
After priming ... (PS: White could also look great!)
...I completely filled the speakers with concrete decor and then made them look "used" with darkening and lightening.
And so that the child does not play on the membranes was still put a grid in front of it.

Afterwards, the speakers were aligned to the seat, calibrated by the AVR and the equalizer was set up for personal preferences.
Conclusion
After about 20-30 hours of play-in, I can say that the sound is very dynamic and also spot-on. In Pure Audio mode (without adjustments by the AVR) it plays the music "as expected"... basically exactly what the composer or sound mixer thought. There's a small hole in the mids, but that's probably due to the couch, as everything sounds "perfect" again further forward.
You don't need a subwoofer by any stretch of the imagination, everything sounds great. Movies are also a lot of fun with the speakers!
The speakers are on spikes to reduce vibrations. All in all, I am very satisfied, had a lot of fun building, have a lot of fun listening and watching. Now I'm thinking about adding more speakers soon.
Also thanks to Marcus Nötzel for his kind help.
Many greetings
Damian

Beat Club Base from Max
Report form Max

Although I mainly deal with the construction of tube amplifiers, I quickly realized that an amplifier can be as good as it is and still sound like crap if there are no decent speakers behind it. In my search for suitable speakers, I quickly realized that there are no limits to the price, but my wallet is. After listening around for a while, I met a colleague who already had experience with building his own loudspeakers and could give me the best advice. Since Intertechnik was just around the corner for us, there was only one phone call between us and a very impressive listening test in the listening room.
It quickly became clear: we would prefer to take all the speakers on site, but after I had described my wishes was clear: the Beat Club Base should decorate my living room in the future and me, as well as my neighbors with beautiful, senior music a la Sepultura, Meshuggah, Pantera and co. Delight!
After the kit of the Beat Club Base was ordered and picked up, it also went directly to the hardware store, buy the MDF blanks according to the building instructions. Thus, material, tools, expertise and experience were now available. At this point, however, it should be said that only the material was provided by me, the credit for the subsequent construction goes (rightly!) To my colleague Dennis!
At the beginning of the construction, the bodies of the two boxes were glued together. Here, however, the lower bridge inside the box was reinforced by another MDF board.

After the carcasses were finished, the fronts of the speakers could be manufactured. Since the speakers and the bass reflex tube should be nicely framed in the front, the first step was to find the right tool.
The router was quickly at hand, but still lacked a tool to frame the perfect curves for the components. Since there was no lack of creativity, a compass for the router was built with leftover material.

Now the front panels were ready, the boxes could be assembled. Quickly still terminals, insulation and crossover pure and off it went. Off to my colleague, connect the amplifier and listen to the test. The Beat Club Base were still perfect for me! We both could not get out of the grin and even next to my heavy metal noise, the boxes could convince: clear and very defined bass convinced with techno and house, while with classical music, you heard things that seemed unprecedented.
Last but not least, the two powerful speakers still had to get the right paint job. Matching the color of the speakers, I decided to go for an understatement and chose a matte black, no writing, no frills. The boxes were to be the "wolf in sheep's clothing" for me, a cheerful black was perfect. Since up to this point I had stayed completely out of the box-building business in terms of craftsmanship, I also wanted to leave the final painting to the professionals. So the boxes went in short to Daniel Esser and Andreas Körlings, who also painted the two boxes in a short time in my desired color.
Beat Club Base – Report of a beginner
Contribution from Laurent

Even as a little boy, I always wanted to build everything and lots of things myself. Among other things, I wanted to build music boxes. Since I also like to do a lot of other things, I never really found the time to deal with the topic of building my own music boxes. But then one rainy day while surfing the web I came across Lautsprecherbau.de and the fire was lit. My computer speakers have been annoying for a long time and the sound of the TV is okay, but nothing that really brings joy. The challenge for me was that I have little experience with woodworking, except maybe sawing, splitting, stacking and burning. To the small experience comes accordingly also a small equipment at tools for the woodworking.
In the beginning I had to think about what I wanted to create. Computer boxes? Stereo system? Home cinema system? For a small system speaks the smaller investment with small know-how. But ultimately the desire is to build a small home theater system. Then the music from the PC can also run directly over it. And in the end I thought to myself, that with the wood may also go wrong, then I just do it again and again and again, until I like it.
As luck would have it sometimes, Intertechnik had the idea of offering a beginner's package around the time of my search. The advantage of the offer is that the wood is cut and the front of the speakers are delivered milled out. So I thought to myself, that's a great fit and just right.
The offer was called: "WHERE ARE YOU?" and included boxes from the Beat Club series. Financially, I could not afford the entire system, so for the time being I decided on a potent stereo system with the Beat Club Base.
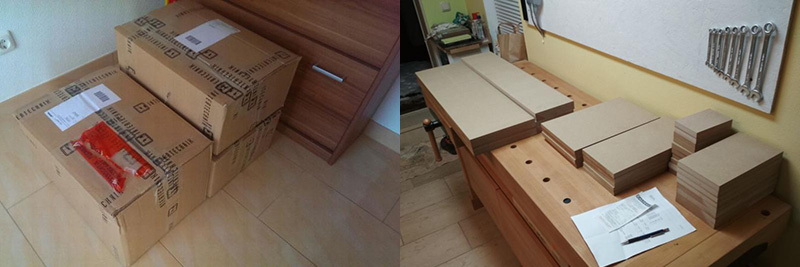
The joy of the packages was great, the unpacking done quickly and the parts laid out according to plan. By pinning with the Lamellos all walls of the boxes were also quickly assembled. But then the first problem arose, how do I press the walls together while gluing? I first had to canvass the neighborhood, who could lend me screw clamps.


Fortunately, there are nice neighbors who have screw clamps. In addition, I used a tension belt, thanks Marcus for the tip. So everything was glued, the distances of the struts measured and inserted and finally the front wall put on. In no time the boxes were assembled. A small mistake has crept in, whoever finds it may keep it. Fortunately, I noticed it sometime before the front wall was put on and was able to correct it.
The next challenge: How should the boxes look like and how do you make something like that? With YouTube you can learn a lot, there are How-To-Do's for almost everything. I wanted to practice painting, so first I had to sand the open edges of the MDF boards properly. So I went to the neighborhood again and got hold of an orbital sander. And there came the first bad experience: sanding evenly has to be learned. And once you've sanded a wave, you can't get it out again with the hand tool. In addition, the open edges of MDF boards are really nasty. Small longitudinal cracks kept appearing and they didn't want to become as smooth as the surface of the boards. I then used wood filler to close and seal the edges. As I just mentioned, I sanded in proper unevenness. So nothing with reflective paint, against the light you can see every unevenness.

Via research on the internet, again mainly via YouTube How-To-Do's, I then found an interesting design. Many different colors jumbled perfectly distract from ungraduated areas and the production was also fun. In a nutshell: Pre-paint once with white, mask off, paint over masked edges with white paint, dab on base colors, splash with more colors, peel off tape, done.

The wiring and assembly in the box was no longer a problem thanks to the good preparation and instructions. The design is somewhat different than I imagined at the beginning of the project and it is quite provocative. But the good thing about DIY is that if you don't like the design anymore, you can redo it. Until then I can still practice a bit.
The sound is really powerful and fills my living room more than very well. In general, I like the sound throughout. My taste in music is very differentiated. Depending on my mood, I listen to almost everything from electro to classical.
BeatClub Base - in lacquer and wenge
Report from Marco
BeatClub Base - First Time
As a hobby woodworker and film fan, building my own speakers has always appealed to me. So I was a silent reader on the relevant sites for quite some time. The day came when it became clear to me that I had to build a few good speakers myself. If one looks around in the net, the way leads sooner or later inevitably to Intertechnik, which have a gigantic offer for the self-builder. Especially if you have no experience in building speakers, advice from the pros helps immensely and cannot be replaced by even the most detailed assembly instructions.
So what should my first build be? The best thing to do is just go listen to different speakers and find out what you like sonically. Descriptions of construction reports can not replace this. No sooner said than done, I went to Kerpen with my buddy in the spring. We wanted to build loudspeakers as a joint project. Here, the choice of a nice pair of loudspeakers for each of us was to determine a leisure activity for the coming weeks. After listening to a few speakers, all of which sounded great, we particularly liked the new BeatClub. Sonically very fine and detailed, neutral and yet very powerful, it quickly convinced us. We also liked the slim design of the speaker with its shiny carbon fabric cones. After two hours of listening and consulting, we drove home satisfied with many impressions gained. The decision was quickly made and ordered. By the way, Marcus from Intertechnik took a lot of time and gave us great advice.
For my large base, it should be a classic, linear design with a prominent front. While Intertechnik packed and shipped the kits, we were drawing and putting together the materials for the build. From the local carpenter I had once gotten a pile of different veneers, from which three sheets of wenge veneer were just made for the speaker front. The other sides of the cabinet should get an anthracite metallic finish, but first I had to build the cabinets.
By now it was after Easter and three big boxes full of speaker components arrived - better than Christmas!
Loudspeaker DIY
I deliberately decided on the following building sequence for my build: build the cabinet, sand and prime, veneer the front, then mill the chassis openings, final paint, assembly. Depending on what you have in mind, you can of course do it differently.
First, all the cabinet parts were labeled with the carpenter's triangle and their position in the overall work, and the respective cabinet parts were laid end to end.
To make it easier for us to glue the housings together, size 20 flat dowels were used. They allow the parts to be joined flush later during gluing, which saves a great deal of sanding. Precise work pays off greatly here. In addition, the flat dowels take a lot of the stress out of gluing, since the parts coated with glue can no longer shift against each other when they are clamped. So marks were made on all sides over the joint edges where the flat dowel cutter is applied. It is also important that the cutting of the panels is as accurate as possible, since the stop is applied to the outer edges. If the parts come out of the blank unevenly sized, they will jam during assembly. Always fasten the workpieces well during milling so that you can work cleanly.
After all parts were milled, everything could be trimmed and the speaker glued.

Gluing together was done in two stages, as stiffening boards are provided on the front and back. First we glued and forced the back and sides. The baffle we put on with flat dowels but no glue there. This all goes quite well, but you have to work quickly until all clamps are in place.
After that, the baffle was taken off again, the two front stiffeners were put in place and the baffle was glued on. Again, measure exactly that the stiffeners are not in the way of the chassis later. From now on, it no longer matters where the front and rear are.

The escaped glue is then removed with a chisel, leaving behind a dense and smooth transition, which is later simply sanded over briefly with the eccentric, orbital sander or by hand.
The next step was to sand the surfaces smooth. Since the MDF boards with their sucking edges were butt glued here, we covered them with fine putty. You can probably prime and fill as much as you like, but the MDF edges still stand out. Although the construction with blunt joints is the easiest for the beginner and can also be done with any hardware store cut, but you have to invest more effort later if you want to have good transitions. Nevertheless, you can still see them quite easily when the speakers are painted. Optimal would be to glue all parts on miter, and to use MDF with primer foil. For this you need a table saw or a cutting board for the hand saw. Next time then.
So we filled the cut edges, and sanded along with the surfaces to 180 grit. We used the random orbital sander with dust extraction, since this is otherwise quite a dusty undertaking. We worked outdoors despite good suction.
Now the cabinets could be primed on all sides except for the baffle, which still had to be veneered. For this, we used a synthetic resin-based product and applied it with the foam roller. In total, two coats were applied with an intermediate sanding with P240 by hand and a drying time of 24h each. The flow of the paint was very smooth and also the strength was excellent that the speakers already looked like they had a final coat. Nevertheless, because of the relatively strong odor of the product described by the manufacturer as low odor, we will take a water-based system next time. After a few days of airing out in the shelter, work continued. Unless only the living space is available for speaker construction, we would definitely advise against synthetic resin systems.


After a short sanding of the front, the veneering of the front took place. Since a straight-line design language was intended, we veneered up to the lacquered edge. There are several options for the transition of the veneer to the lacquered edge and the treatment of the veneer. We tried these out with several test pieces to make a decision. No drawing program can convey the haptic impression and surface gloss as a model can. The result was to only finely round the edges, oil the veneer and then polish it with wax. With this treatment, the dark color and depth of the wenge comes out beautifully, creating a silky matte finish. Next door is veneered around the rounded edge with radius 3mm and gloss lacquered. You can see how the different treatments can make the color of the wood look very different.
So now the veneering could begin. To do this, the veneer sheets were cut with a tight oversize with the veneer saw and sorted as if lying in the log, so that the speakers look symmetrically mirrored at the end. When gluing, I put a suitable thin foam sheet in between so that the pressing pressure is well distributed even with possible small ripples. The whole thing is simply glued together flush on the long sides as a three-layer package.


Using a fine notched trowel (tooth height 2mm), simple D2 white glue was applied to the speakers and neatly distributed. The notched spatula ensures that the surface is completely wetted, but does not push out excessive amounts of glue or even create waves in the veneer. In addition, the glue application goes with it very quickly that the glue does not set prematurely already.
Previously, the primed sides were taped off a bit to protect them, but that wasn't necessary because the glue can be easily wiped off the painted surface with a damp cloth. So there would have been no need for the tape.
After the glue was briskly applied, the veneer package was laid down and the baffles were pressed "face-to-face" flush against each other. It is important to align the edges flush. For this purpose, my body clamps were used, which can grip powerfully without leaving any traces.

This really worked out great and after stretching the parts we could enjoy two perfect veneer surfaces completely without cracks and furrier (bubbles under the veneer). For those who have problems with the ironing method like cracks or discoloration - just try this method!
The next step was to remove the overhangs. If you are very careful, you can do this by hand. Wenge in particular is very prone to splintering and tearing, so I used the flush cutter, which worked well. Of course, it's best to veneer an oversize panel first and saw it to size. If anything tears out, pick up splinters and glue it right back in or superglue it in place. Now it is still easiest to finely sand the glued veneer. This was done (grit 320) and finally the chassis openings could be milled.
Here the disadvantage of the chosen construction sequence becomes clear. If something goes wrong during milling, you start all over again. So work carefully. Since we wanted to have well-fitting cutouts without gaps, we made a test milling for each chassis in a MDF remnant until it fit well and only then made all the corresponding millings in one go. We used a simple homemade router with a nail for centering and a caliper to set the radius.
Fortunately, everything turned out well and thanks to a sharp router bit and only a little infeed during the first routing pass per chassis, there were no tears in the veneer. Then simply break the routed edges briefly with fine sandpaper. If something splinters, you can help it with some superglue. After all outer diameters of the chassis were milled, the milling compass was made smaller by the width of the basket support and the baffle was milled deeper. Here it is no longer a matter of tenths. We did not mill all the way through, but left a few millimeters and cut it out roughly with the jigsaw. The last protrusions are milled with a flush milling cutter with a bearing on the shaft side. You can of course rasp, sand or just leave it here, the chassis just have to fit in.
The milling of MDF is really a dusty affair, also here a reasonable extraction is very worthwhile - it is recommended to every hobbyist.

After milling, the veneered front is neatly masked off so that the final coat of paint can be applied. Here we used a water-based PU-reinforced color lacquer in anthracite metallic, which was thinned and sprayed in two applications with the gun. Then at the end, clear coat over it, done.
The transitions from varnish to veneer were then sanded clean by hand with fine sandpaper. Now it was finally time to finish the veneer. When applying the oil, you can clearly see how the wood is fired up, which is always an exciting moment.
After the oil dried, the surface was finely polished by hand with a beeswax polish and a cotton cloth. A silky sheen emerges. Meanwhile, we could hardly wait to finally hear the beautiful pair of speakers. All the components were also eagerly waiting to move into their new dwelling.


But now no rush, so as not to screw up anything in the last few meters of assembly. First, the screw holes for the chassis were pre-drilled. In order to hit the center exactly, the chassis are inserted, aligned with an angle, the drill holes are pre-drilled with the center punch shown in the picture (very handy!) and 2mm guide holes are drilled. This also allows each screw to sit straight and not warp when screwed in.
Next, the crossovers were screwed into the cabinet with as much distance between them as possible. Actually, we had prepared to build the crossovers ourselves, but they were already delivered very carefully built on stable circuit boards by Intertechnik. Of course you don't say no to that! Another advantage is that the finished crossovers can be mounted directly to the speaker backplane through matching screw holes in the PCBs. Due to the color-coded connection cables, the further cabling then also became child's play. Lay the cable through the respective opening, shorten it to the appropriate length, remove the insulation and solder it to the chassis, alternatively crimp flat connectors. This procedure will be well known to every speaker builder. To protect the wooden surfaces from solder and flux splashes, we simply used cardboard boxes as a base.
Still insert the insulation wool and the chassis could be put in place and screwed. Only now the protective covers of the chassis are removed, so that nothing really gets to the noble baffle transducers!

The drivers fit perfectly. The exact measuring, test milling and work during the assembly of the speakers was really worth it in retrospect.

Dare to do it yourself - it's worth it!
When you implement a project like this, it's not just "to build a pair of boxes". The path is the goal - to come step by step to your own unique, makes the charm here. From a simple plate material a great loudspeaker becomes with the individual handwriting and according to one's own ideas. It is a beautiful moment at the end of the journey to insert the drivers and finally have the finished pair in front of you. Overall, the construction was an experience that you probably can not even remotely experience when buying in a store.
Listening impression:
Hearing impressions are of course always subjective, so it's best not to read much, but to listen! For me, the speakers are used for listening to music and watching movies. They are driven by a 7.2 Denon AVR. Set up they are about 3m apart and directed to the listening position, which is the center of the sofa.
In stereo mode, the speakers receive their signal in direct mode, i.e. without DSP influence. They sound very balanced, bass comes across very crisp. The highlight of the speakers is undoubtedly the brilliant, very lively high frequencies of the ring domes. In my opinion, this is where the BeatClub clearly stand out from similar systems. Even most of the speakers I know do not keep up here. As a background speaker, the BeatClub plays pleasantly and unobtrusively, but it seems to be rather underpowered here. Only at a higher room volume in a large room does it become really dynamic. Here, a room-filling sound firework can be heard that inspires.
The loudspeakers really pack a punch and revealed to me many previously unheard details of my favorite CDs. You should listen to "Let me in" by the Beatsteaks, the albums "Between two Lungs" by Florence and the Machine, Coldplay with "Mylo Xyloto" or "The 2nd Law" by Muse on the speaker. Those who like it more classical will be enchanted by Norah Jones. Goosebumps, promised! There will be aha effects with the newfangled streaming and MP3 services, because the speakers mercilessly expose bad recordings or low bitrates.
In movie sound after successful calibration of the neat Audyssey XT32 system, the fun with multi-channel sound can begin. First of all, five speakers are connected to the AVR, tendency very likely increasing, as the experience here on the website shows. In cinema mode, I like to drive somewhat higher levels. Here, too, the BeatClub shows its powerful and finely drawn side. Even without sub support, you can make really proper steam with them, without losing details of the mids and highs. If the listeners take a seat in their sweet spot as much as possible, they impress in terms of three-dimensionality. If you want to watch movies to several, a center is recommended, which I also built.
Really highly recommended for great evenings in the home theater are the bluray concert "Live in Prague" by Hans Zimmer, the movies "Tron: Legacy", "Mad Max", "Dunkirk" or "Bladerunner 2049". The BeatClub team plays the lossless encoded tracks of the blurays very confidently. Even in complex, action-packed scenes, the speakers seem unstrained. Cannon shots and detonations are reproduced so bone-dry and infernal that you feel like you're right in the middle of it. At the same time, the cleanly processed 6-inchers from SB Acoustics come surprisingly deep. "How can that be?" we ask ourselves on the sofa with a broad grin. The neighbors will quickly notice that new speakers have moved in. If you want to have the total apocalypse at home, put another one or two decent low bass hammers alongside the BeatClubs.
After several weeks of listening, the conclusion:
The BeatClub is a really great, balanced all-rounder that plays very detailed and can also really loud! The self-build is totally worth it, because for a good price you get fabulous speakers here. Thank you!