


- Description
- Satorique S3 read report
- Ingos Satorique S3Be
- Werners Satorique S3Be
- Pärs Satorique S3Be
- Ilgners Satorique 3Be
- Hans Satorique S3Rd
- Alexs Satorique S3Be
- Peters Satorique S3Be
Build a Satorique S3 and the curtain falls by itself - no other loudspeaker has to enter the stage yet. And as always, our decency dictates, we thank our development team for this wonderful construct, which should settle as a finished box sonically in the five-digit range. So I anticipate the recurring question, "What does something like this cost out there?" Here, the upscale self-build more than pays off.
Sound: Authentic with additional highlight
Certainly, there are always speakers that reproduce the sound authentically, open up an excellent stage and project the music into the listening room as a flawless hologram, so to speak. The Satorique S3 manages that easily. The Satorique S3 plays completely neutral and level stable. It is a true high-definition speaker, capable of reproducing the sound quality of high-resolution sources without question.
Sonically, the Satorique S3 thrives on its particular attention to detail combined with tonal neutrality and a dynamic range that few speakers are capable of reproducing. These dynamics enable both quiet listening with an unusually clear clarity and loud music listening without any coloration or annoyance.
So, if you have an unexpected visitor at home, you should be prepared for a longer evening if the visitor is only halfway music-savvy. Which is certainly something you're happy to put up with, right? After all, you like the doubtful faces when you oute yourself as a speaker self-builder. The speaker kit includes all electronics, speakers, parts and accessories, except the wood for the cabinet. Completely built crossover included.
Curious now ?
Read the complete report in the next chapter tab.
Satorique S3 – high definition for your ears
Perfectionism or not? A two-and-a-half-way speaker with or without beryllium dome ...
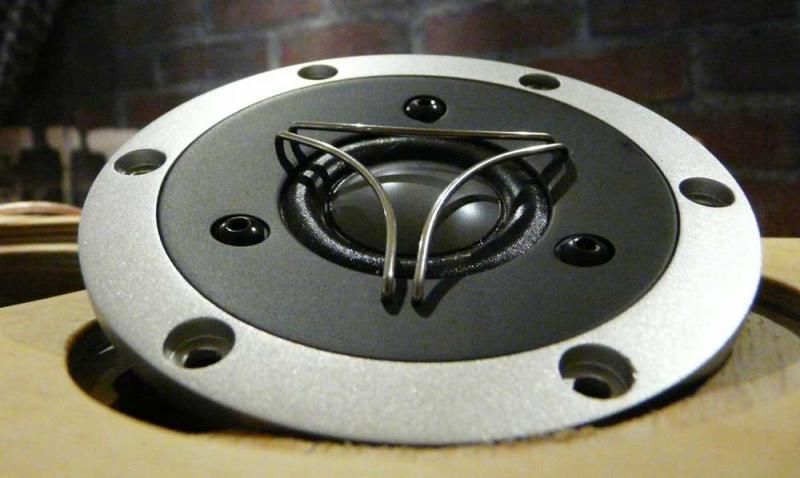
The same speaker in two versions - one with and one without beryllium dome - is an exciting approach. Both speakers carry the same characteristics and yet the one still offers an ounce more of audiophile resolution in the important high-frequency and especially also in the brilliance range, so that the higher-quality dome has the sound property of an excellent diamond tweeter.
With the appropriate crossover update, the box can even be upgraded from the cheaper to the perfectionist variant - after all, idealism won out in the development and we still do not want to deprive you of the cheaper variant.
The Satorique 3 / Satorique 3 Be stands for HiRes audio and offers a very special experience for the ears. For more and more audiophile sound gourmets, streaming MP3 files is by far not enough anymore. What to do when the demand rises above the data volume of 64-320 Kbps? Then we are talking about high-resolution audio files of the formats 24bit/192kHz as Flac-AiFF and -WAV. So fed, the Satorique 3 as well as especially the Satorique 3 Be celebrates high-definition for our ears - because in the end it always depends on the speaker, which has to convert an input signal, no matter how good, into sound before we can enjoy it.
In many cases, these studio-quality recordings sound much cleaner, more spacious, and more detailed. Singers also sound much more natural in the timbre of their voices. Many small details simply present themselves better with the appropriate clarity. What factors play a role in encoding analog sound?
Many audio systems encode the analog sound (i.e. the natural sound waves) using a method called PCM (pulse code modulation) and convert it into a digital format in this way. Here, the quality is composed of bit depth (16 or 24 bits, for example) and the sampling frequency. The number of bits in the encoding is particularly decisive for the sound: the dynamic range increases with the number of bits - this makes the difference between the background quietness or the softest and the loudest sound.
Digital music databases are now plentiful. Even classic analog records from the 1980s have long since felt the change of the times: Naimlabel or Linnrecords, to name just two, have adapted to the modern music world.
Anyone who doesn't keep up with the times today is missing the boat. This can also be related to the modest budget of the self-build developments: There's not much room to maneuver when it comes to the ever-increasing demands of customers. This forces us to rethink: The developments must be targeted, "less is more" is the motto, because always the same would not do justice to a modern target group, which has the demand of many different music sources. For this very reason, higher-quality kits will be the goal of our developments in the future - they don't have to be equally expensive, as our trick with the tweeter variant proves.
But how to get such a speaker in the DIY?
Years ago, it would not have been possible to build such an optimal loudspeaker in this price range - today, however, the modern drivers and the merged team from the fields of room acoustics, development and cabinet design result in completely different possibilities in product development.
And how can one still create a highlight with the mass-produced loudspeaker designs if everything is just a copy of old designs? So we came up with the approach of sending a proven design - with a 6- to 7-inch woofer and a tweeter - into new development without compromise. How is this supposed to work?
Concept: The tried and tested 2.5 and 3-way
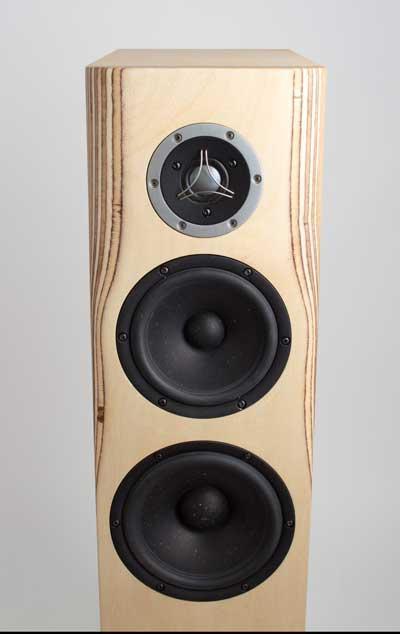
rom the past we know a 2-1/2 way speaker usually with two identical loudspeaker chassis for the low-mid range, which then have to master this frequency spectrum together completely acoustically. But there is another way: It is indispensable that the lower bass-midrange driver in the 2-1/2 way speaker is a pure woofer and the upper one is a bass-midrange driver playing over a very wide frequency range. Therefore, ideally one needs a level-firm ("loud") bass driver as well as a low-midrange driver playing almost like a full range driver, which then usually cannot be quite as loud. The art is then to integrate these two into the cabinet in such a way that in total a deep, clear and resilient bass with a detailed midrange is created, which reproduces voices and instruments in all their fine nuances. This special design thus combines the advantages of the two-and-a-half-way speaker with its high efficiency and the advantages of the three-way speaker with its detailed performance in one loudspeaker.
This is exactly what is so special about the design of the Satorique 3.
In practice, the Satori 19 cm plays as woofer with its immense level stability - as it has already proven many times in the Satorique 4 - and as bass-midrange driver the Satori 16 cm with its exemplary broadband performance. With this bass-midrange speaker, the seamless transition to virtually any decent tweeter is possible in many crossover variations.
Crossover: Acoustically optimized
When developing two-and-a-half-way speakers, one has to deal with the problem that the high frequency range tends to be annoying due to its strong emphasis or the speaker sounds strained. There is a remedy for this: the 6 dB crossover. This is without much effort electrically correctly constructed, but as a rule acoustically cruel, because the low-midrange distorts the high frequency range by membrane resonances and the tweeter is exposed to immensely high loads in its free resonance frequency. This even tends to spoil the fundamental range.
For the Satorique 3, the initially theoretically calculated crossover is acoustically optimized. This is a long process, as both extensive measurements of the loudspeaker are required as well as extensive listening sessions, each with slight corrections of the individual components. The usual crossover development with simulation serves only for the normal crossover tuning, which is the basis for further acoustic optimization.
With this basic tuning, which aims at a linear play, a harmonious transition between the chassis and a balanced omnidirectional behavior of the box results. Already in this way, a normal loudspeaker plays well in a balanced way, which is quite sufficient for normal chassis, since the nuances of the music simply dampen away or cover up smaller inconsistencies - this is how many finished loudspeakers are developed in practice.

Then comes the real freestyle: Before the crossover optimization, the finished loudspeakers must first be run in for a week, because with such high-quality chassis, the crossover can only be finalized after the run-in, since the mechanical properties only set after the run-in process.
In the acoustic crossover optimization, interference - acoustic cancellations due to phase shifting - between the individual drivers, which inevitably occurs due to the spatial separation and arrangement next to each other on the baffle, also plays the decisive role.
For the area of the chassis in which it plays acoustically undisturbed, this effect is rather unimportant, just as in the areas in which only one chassis plays. The transition from one to the other chassis and, in addition, disturbances relative to the ideal behavior of the chassis - which is the rule above the crossover frequency to the tweeter - are acoustically sensitive areas that significantly shape the detail resolution and are compensated for in the Satorique 3 by the crossover.
The adjustment of the upper bass is also a very special matter, since damping, excursion and subtle level changes are what make it possible to experience the bass and the size of the reproduced sounds in a vivid way. This results in a complex crossover, which can no longer be described in a differentiated way in the interaction of the components, let alone developed by a layman without the appropriate measurement technology and experience.
Measurements:
Housing: exceptional approach
The bass of the Satorique 3 is dynamically designed and is characterized by the shape of the cabinet. Here, an ideal bass reflex box is an uneven volume, with maximum lengths as short as possible to avoid standing waves. Of course, this is in no way a design approach for the living room. Therefore, the theoretical ideal volume must then be transferred into a pleasantly proportioned floorstanding speaker.
In the case, the bass is damped against standing waves behind the chassis by a piece of black Sonofil (which is finer than the white version), and the air volume, which is important for the Helmholz resonator, is coupled via a perforated board. Strictly speaking, the perforated board is an acoustic port that reflects higher frequencies and allows the low frequency range to pass through. This makes it possible to get dynamic, detailed bass with minimal damping without compromising the midrange and treble due to standing waves in the cabinet.
The mid-bass compartment is optimized by a slanted board. The relatively small volume results in a rather crisp bass, this volume is moderately damped by one and a half pieces of Sonofil black.
The tweeter disappears completely into the 30 mm thick front. For the tweeter, the baffle shape in particular is crucial for the sound arriving at the listening position - and thus for the sound image of the speaker. The chosen position in combination with the rounded edges - which can also be produced as a 2 cm 45 degree bevel - results in a very balanced dispersion pattern, which gives neither an obtrusive presence nor a pale high frequency.
Thus, a simple plain cabinet with a still living room pleasing size and by the choice and arrangement of the drivers of a balanced view. So that the cabinet can also functionally accommodate the crossover, it has a tightly dimensioned compartment in the bottom.
Leinos Finish Hard Wax Oil
Our Satorique 3 was made from a cabinet kit in birch multiplex. The wood was soaked well overnight with a wet cloth. After the fibers had set up, the wood was sanded with 180 grit.
An old cotton shirt is sufficient for all operations. First, the Leinos Hard Wax Oil is applied thinly and the excess oil is wiped off. The next day this step is repeated. The last step on the following day is polishing with the last corner of the shirt. Since this product has a commercial approval, it is extremely resistant.
Once complete, please!
Here you go, a case kit for the Satorique 3
If your time window is limited and you are also restricted by the available workshop equipment in terms of execution, the housing kit, which is available in different variants, will help. A completely assembled housing is also listed in our store, so you only need to worry about the finish. Why not combine birch multiplex, beech or black MDF. Feel free to contact us for your speaker implementation idea.
The assembly is done with lamellos for a secure hold, so tension belts are perfectly sufficient if no screw clamps are available.
A beautiful 3D baffle and shadow gap complete the look of the Satorique 3.
Sound: Authentic with additional highlight
Certainly, there are always speakers that reproduce the sound authentically, open up an excellent stage and project the music into the listening room as a flawless hologram, so to speak. The Satorique 3 manages that easily. The Satorique 3 plays completely neutral and level stable. It is a true high-definition speaker that can reproduce the sound quality of high-resolution sources without a doubt.
Sonically, the Satorique 3 thrives on its particular attention to detail combined with tonal neutrality and a dynamic range that few speakers are capable of reproducing. These dynamics enable both quiet listening with an unusually clear clarity and loud music listening without any coloration or annoyance.
So, if you have an unexpected visitor at home, you should be prepared for a longer evening if the visitor is only halfway music-savvy. Which is certainly something you're happy to put up with, right? After all, you do like the doubting faces when you outed yourself as a box self-builder.
And yet: Is that really all?
"A striking musical representation is basically nothing wrong, but even the right thing eludes representation." - So or so similarly it could be written in an elevated sheet of the written down music reproduction culture. Heavy fare.
Ray Charles in a live recording is in such a stage representation a not everyday experience. One only really becomes aware of this when older two-and-a-half-way constructions are used for comparison. Then one quickly notices how much midrange information is ultimately missing there.
The Satorique 3Be puts the spatial representation on a - let's say - elevated level of lightness, in its loose representation of music reproduction only difficult to achieve. This is exactly where the difference lies with the slimmed-down Satorique 3: If you simply want a very, very good speaker, you can easily manage with the inexpensive version; if you want more, you'd better listen to the Satorique 3Be before buying.
All those who can not come to Kerpen, ...
... find here a sound description:
The evening souvenir of a music friend, which turned out to be a loan from an essentially younger generation, brought amazing things to light. What the red hot chilis from the Tenor - Satorique 3Be- peppered to the ears in its evening papyrus garb of the 6.5 incher was amazing.
Forgive me for the somewhat robust pronunciation. "You listen to Red Hot Chili Peppers?", I ask the 60s-born fellow sitting next to me. "Nah, that's a loaner from my daughter."
An older speaker relic standing in our listening room had quickly gone bye-bye in the midrange vocal presentation. "How is that possible?" We looked at each other, "That can't really be." And yet, the Satorique 3Be can do quite a bit better than many a speaker.
It's hard to imagine what Chris Botti's portrayal of Caruso conjures from the trumpet in terms of form and lightness, presented at medium volumes with a strongly upper-emphasized spectrum in the room. Whereby the greatest energy of Chris Botti's trumpet is not in the fundamental, but at 1,000 Hz to 1,500 Hz - pure goosebumps.
So everything perfect?
Annett Louisan can answer this question better in her album "Läuft alles perfekt" - listen to it, the singer really has a lot to offer, provided that your speakers are up to the task.
But beware, some of the high frequency candidates of other loudspeakers chirping in the upper realms can thoroughly ruin your evening. The willingness to close one's eyes is rewarded with a voice that fills the room - no, makes it bigger with its presence from verse to verse - with the Satorique 3be. Play tip: Leona Lewis, "Spirit".
The need to exchange this construct of wood, paper, plastic and metal for a concert hall sinks with each verse and draws us into the spell of relaxation, when first goose bumps run down the arm.
Finally: Satori Beryllium in its full resolution - how could it be otherwise with such experienced developers, who have already left their service and signature at Scanspeak all these years and have now delivered their masterpiece at Satori of all places - to our and your luck.
So all is well, but there is one more little thing that has been the undoing of many speakers - "Barcelona" with Freddie-Mercury and Montserrat Caballe:
Keeping the big stage and Montserrat Caballe's high voice upright with the necessary bass depth and the huge orchestra is not easy, and as if that were not enough, there is also Freddie-Mercury to follow, which does not necessarily make it easier. And yet, the Satorique 3be doesn't fluff in any way.
If we are already drifting through the music world, we follow Montserrat Caballe, "Hijo De La Luna". Here, too, many a competitor even from the upscale tweeter camp gets out, so that the ladies with delicate ears, who in the meantime alternatively listened to a few other speakers, almost decided to go home.
So it explains itself that we are gentlemen enough to draw the consequences and changed the binding posts back to the Satorique 3be. Pure energy.
Build a Satorique 3be and the curtain falls by itself - no other loudspeaker has to enter the stage yet. And as always, our decency dictates, we thank our development team for this wonderful construct, which as a finished box should settle sonically in the five-figure range. So I anticipate the recurring question, "What does something like this cost out there?" Here, the upscale self-build more than pays off.
In this sense, I say goodbye with the last track tip: Buffalo Soldier - it is unnecessary to mention who this song is from, if it is played by the right speaker: from the Satorique 3be ... from where else?
Satorique 3 SBe- Goosebumps Feeling
Contribution from Ingo
I could be angry that all these years I did without the goosebump feeling you get when you are in the "sweet spot" of two stereo speakers. The tingling in the head when a stage opens up and you sit between the band in your own living room, I had unfortunately lost due to the fixed idea to use a surround system in my new house construction. Sure, it crashes and roars during blockbusters, but listening to music is unfortunately not possible with it. Also, all the Bluetooth speakers I've accumulated have kind of dulled me.
Then I remembered that I still have some homemade speakers (25 years old) in the attic. When I recovered the beasts from the attic, I suddenly felt like Peter Pan in Lummerland. After I made the decision to build the Satorique 3be, my little HiFi heart was beating wildly again.
So I downloaded the construction plan and went to the Bauhaus. To my delight, the man in the red shirt with the earplugs around his neck told me that he was a carpenter and that half a millimeter of accuracy could be achieved - perfect. I then just sawed the small boards to size on my table saw and then the glue was applied.
Some colleagues, to whom I already reported on the construction phase, told me that their wives would have beaten them to death long ago if they had done such a project on the dining table. My wife was quite relaxed about it (even still painting and wet sanding) - thanks Britta !!!
With proper glue and a few screw clamps quickly resulted in a housing, which I then processed with the orbital sander (outside, by the way).
The baffle I have glued together from two MDF boards, so that has resulted in an approximately 36mm plate. With the compass I marked the cutouts of the chassis. Here, by the way, should not be sloppy, because everything should also fit to the already glued cabinet and the later cutouts of the reflex tubes.
By the way, the milling compass was the best purchase in the recent past. It is almost as exact as a CNC mill, if you work precisely. I first milled the inner circle to half depth, then the outer cutout and then milled through the inner circle. If you first milled the inner circle completely, you would no longer have a guide and then the baffle would be in the bucket.
As is proper, I also milled out the back with a wide phase, so that the sound can do its job unhindered.
This is followed by the so important formation of the baffle shape. The rounding around the tweeter prevents "edge diffractions" and allows the sound to radiate as the designers imagined. Admittedly, this was a bit fiddly.
Since I was sanding this by hand (and watching TV on the side), I also sanded too heartily at times and then putty again. But I did not want to see any "dents" in the box at all when the light fell from the side.
Time to bring some color into play. Since MDF seems to be even thirstier than I am, you have to prime with "MDF Primer". That I primed and sanded several times, I mention only briefly, because this is really a somewhat unpleasant, although somehow "meditative" task.
After priming, I milled a shadow gap into the base and baffle.
Oh yeah. I don't have a picture of this now, but I treated the baffle with a Lammello milling machine so that nothing slips later when gluing.
Even before the actual paint, I marked the holes for the bass reflex tubes and milled them out. When you see the small 2mm edge, it becomes clear how accurate the milling compass can be.
Even though I had already put a considerable number of hours into the project, the "felt" most time-consuming part was the painting and sanding. With the roller I applied the solvent-based acrylic varnish. Then, after the drying phase, sanding - but not too much. With lots of wet sandpaper, I managed to get a pretty even surface. But painting and sanding once was not enough. It must have been three passes. To improve the result even more, I used another liquid abrasive - I mean 5000.
Last but not least, I applied some car polish. After that, everything was so nice and smooth that the speakers feel like oversized hand candy. The only thing missing were the drivers, which were delivered one fine day (and in retrospect, that was really a fine day) by a parcel carrier.
When I unpacked everything, I was almost speechless by the scope and quality of the components. I had held a crossover in my hands before, but not one that could have been used to defend against burglars in an exceptional case. The woofer and tweeter crossover together weigh just under three kilos.
Stowed and screwed in the lower compartment, the crossovers can work unimpressed by the bass pressure of the speakers. Also the connection terminals could be used as caipirinha pestles - as massive as they are. It looks as if this kit has been given a bit more material than its Far Eastern, price-optimized, but distant relatives.
It was getting later and later in the evening during assembly, but I wanted to at least test one of the two bolides before sleeping.
The bass reflex tubes were quickly inserted. Since I had milled perhaps half a millimeter too large, I have eliminated the gap with insulating tape. Everything sits now very nice and tight.
After that, I glued the baffle to the body with the help of some screw clamps. For this I had previously made discs that fit exactly into the chassis cutouts, so I had to force as little as possible on the finished paint.
They were quickly soldered and were now still screwed. Finished were the speakers, from which I had promised so much. I must say that I bought them only because of the construction reports.
By the way, I had "coupled" the speakers to a thick, fat granite block because of my laminate floor with spikes and "decoupled" it from the floor with a washing machine mat. Together, both speakers with granite block weigh 120 kilos. Absolutely nothing wobbles.
By the way, I got the granite rod as a meter piece from the hardware store. It wasn't easy to get it into the car alone.
But now to the sound. I can summarize the description perhaps in such a way: Absolute goose bumps. Very brilliant due to the fantastic tweeter. The sliding of the fingers on guitar sides is clear and present as never before (Keith dont go). Female voices - like on the track "Trollabundin" by Eivor or on "Storm" by Heather Nova - are so convincing in space that it is hard to put into words. Even a "Big Spender" fills the entire room and is accompanied by a dry clear bass that justifies every minute of construction time and every penny invested. A bit of attention should be paid to the room, of course. Something away from the wall, reasonable cables and no bare concrete room (tips on this are plenty on the Internet).
In short: I am back in HiFi heaven and thank the team of Intertechnik for the excellent work !!!!
Greetings Ingo
Satorique S3 BE
Contribution from Werner
Dear Marcus, now a short report on the construction of my Satorique 3 Be.
I was very excited at my visit in Kerpen at the test listening. And then after a few minutes convinced of the potential of the speakers - also the dear service, Whow.
The delivery and packaging was very professional and was accepted by my neighbor accepted. Everything wonderfully packed and and arrived well. The wiring diagram was forgotten but delivered by mail by calling me. Thank you for the service.
Then building the boxes
I try to give some tips here and also report some failures. From the overall result I am totally thrilled and would recommend everyone to build such a wonderful speaker yourself than to spend money unnecessarily in the market. Of course a certain risk, but it is worth it.
The wooden parts are super cut and fit perfectly, but be careful with the final dusting. Commercially available Swiffer or dusting cloths tear chips from the furier which have to be glued back on. Soldering the wires to the speaker terminals at the bottom of the rear panel requires a 60W soldering iron which I got, but soldering the BE tweeters is critical with the power. I was lucky that everything was not thermally overloaded.
About the wood construction itself
Please spread glue well with glue brush and do not apply too thickly.
The lid on top is a problem because it wants to be fitted very well. You have to be quick anyway, the glue sets quickly and there is no time to think. I have worked without glue clamps and used tension belts, please pay attention to sufficient edge protection and be fast. Remove the glue residues on the front panels quickly and thoroughly, makes the whole visually better.
Tip:
Mark the lines well and "double check" and then glue. As an electrician, I stripped the pre-tinned wires again by the length and tinned, because I think I can then have better contact. The paint I have done with Leinos "Light" because then the birch appears more natural.
The paint I have done with Leinos "Light" because then the birch appears a bit more natural.
Since I was a bit impatient I have applied the 3 orders within 2 hours, which makes my room now after 3 weeks still stinks.
The overall result that I have crowned with a Cyrus One HD and a Cyrus CD t should be enough for me for the next 30 years. Then I am 89............and it is then probably at 1000 Hz
End......?
Thanks to Marcus
And I glued 4 mm felt on the bottom.
Pärs Satorique 3 from Sweden
Contribution from Pär
Hi Marcus Here comes a short review from the building of the speakers and my impression of them
Review Satorique 3BE
I've long gone into plans to sometime build a couple of really good speakers. I like music, good sound and like to carpentry so in the end I decided to do it. After much thinking and googling online I finally found Intertecknik and their kits. I wanted a floor stand speaker and liked their model Satorique 3Be with the nice Berlylium tweeter as crown on the piece.
While waiting for the package to arrive, I had the drawing sent to me and bought the mdf home in the right dimensions and started the fun construction. The design itself was not so difficult to build but it was important to be careful with all mm to get it neat and it was used a number of test pieces to get to the exact sizes of the holes for the elements. I chose to saw the sides at 45 degrees at the top to get a nice transition and it turned out really well. The hardest part of the construction was probably to get to the bevel on the baffle so that it was smooth and equal on both speakers but after a bit of crafts it went well even thou some minor flaws had to be solved with a little putty.
There were some questions during construction but I got good help from Intertecknik to sort out all the concerns and in the end the construction was finished, damping and cabling in place. Before I went to paint them, I test-mounted all the elements because I was so curious about how they would sound. The first impression was pretty good but not yet outstanding. This changed after they got played in for hours and they opened up and they sound fantastic. It was hard to dismantle them again but they need to be painted and fine to so it was just to do. The work of putting, grinding and painting took its time when I had decided to use the high-gloss 2 component boat paint and it did not get any better by me making the mistake of using the wrong kind of roller that released fluff and I had to grind them down again and paint once more. The end result was really good, just as I imagined them in white high gloss.
I have now had the speakers ready and played on them for a few months and I'm really happy with both them and the support I got from Intertecknik during construction and can highly recommend them as a supplier. I learned a lot during the construction and itches already in my fingers to possibly build something new....
Satorique 3Be
Contibution from Ilgner
In mid-April I celebrated my 50th birthday and I wanted to give myself a few new speakers. As is well known, the best gifts you make yourself ;-)
After a long search, and almost endless research and reading of construction reports, etc., a model with Eton drivers and the Satorique3Be with drivers from SB Acoustics had emerged. So I auditioned both and the Satorique3Be clearly won the race. Although daintier looking, it played much more grown up and punchy, had a much better resolution and also the voice reproduction and the bass I liked better.
So, I ordered the kit and had the building instructions emailed to me. I wanted to build the cabinet myself. On the Internet ordered the wood and then it was called waiting.
The front is 30mm thick, so I had to glue 2 plates a 22mm and 8mm together.
In the now 30mm thick front the cutouts for the chassis were milled, then in the upper part the edges were strongly rounded.
The intermediate board was provided with 48 10-holes, the lower part of the housing acts as a Helmholtz resonator.
2 holes each for the ports were milled into the back panel. A good milling compass is worth its weight in gold here.
Then the boards were glued together in several steps and after they were well dried, everything was sanded smooth and flush with the eccentric sander. Since a crossover sits under the box, I pulled strings through before I glued the front on it, with which I then later pulled the cables through.
On the outside, I simply applied 3 coats of white hard wax oil from Leinos with a roller. The surface should be matt and white.
I wanted to decorate the front with the Japanese sign for enlightenment "Satori". Since I'm a KungFu teacher also professionally a bit in touch with Zen Buddhism, this fits quite well to me. So I had the stickers made in the appropriate size on transfer film. Surface cleaned, position measured and stuck on.
The housings were now ready. Now it was time to wait again.
After a good 2, seemingly endless weeks, then the switches, chassis, etc. arrived at me. Everything was well packaged and made a quality impression. I was a bit surprised about the size and weight of the turnouts, 4 in total. I had not seen anything like that before. The large one fits exactly under the box, the slightly smaller one was stowed in the upper part of the housing.
The cutouts for the chassis had become a bit narrow and had to be briefly resharpened, otherwise the installation was a breeze. I pre-drilled the holes for the screws with a 2.5mm drill bit.
Then came the big moment. Loudspeakers connected, amplifier turned down and music turned on. Slowly turned up the volume, the first sounds were heard. All speakers worked, cool everything done right. The sound was already great, but I didn't want to listen too closely. First let them play in. Spatially, they are too close to the wall in my house, so the bass boomed a little. There was still dark Sonofil left, so I divided a mat lengthwise, rolled up and put half into the bass reflex tube.
The sound is so perfect. After a good 100 hours of play-in time, I then listened to music "concentrated", or rather enjoyed it. It is really a real pleasure to listen to music with it, almost every song reveals new tones that you did not know so far. For a good 25 years I own omnidirectional speakers from the noble Schlenzig , really not bad speakers and I also have some good headphones. But the Satorique3Be puts everything in the shade, the beryllium tweeter brings an incredible amount of detail to light.
In doing so, it sets a perfect stage, the music is almost completely detached from the speaker and fills the room with ease. My expectations were not low, given the price range, but they were far exceeded. I would build it again anytime!
Thanks for the first class kit!!!
My First Time - Satorique 3
Contribution from Hans
Preliminary
Moin Moin dear construction community,
where should I start...
5 years ago I got his old amplifier from a friend for the student price of 80 euros. At that time I did not even know what I had bought for myself for thereby for a part. My old amplifier was broken - no money for a new one - a friend helps me out of a jam - I connected my old discount boxes - perfect... Later, when it came to earning my own money, I needed a new sound system. I browsed the net for digital networked audio solutions and had decided on one. "Only what do I do with my old amplifier".... "Let's see what it's still worth".... Ebay was where the research should begin.... Should I still get a hundred with the old mill I can reinvest the money right away. And lo and behold... My old 30 year old box was still sold. But I could hardly believe my eyes. Prices between 850 to 1000 euros, can that be....? I thought, "1000% profit and enter the digital revolution, or rather the reference class of Sony from the 80s...". You can imagine how my decision turned out;). Since I really like to work with wood, I immediately thought of the LS self-build and researched.
Without a big plan, I began to deal theoretically with the self-build. Unfortunately, I had to experience like every newcomer, from an answer two new questions arise. And so on... For this reason, my decision was more emotional than rational. The internet presence and the customer service of Intertechnik were the most appealing to me and the Satorique 3... Well, love at first sight. After much deliberation and back and forth, my decision process ended with: Fuck it, it will be the Satorique 3.
The beginning
The construction should begin... With the incredible number of opinions on the subject of building speakers, I was glad that everyone agreed on the choice of material. MDF: easy on the wallet and has the best acoustic properties. True to the motto: A lot helps a lot, I got myself 22mm MDF boards and cut them to size. The front panel I had made by Intertechnik, because I was missing the router until then. So far so good, my new table saw made the cut to 0.5 mm tolerance, perfect. The rest should do the screw clamps when gluing. But before that, I got a flat dowel router from an acquaintance and completed this step. While milling, the first gross mistake happened. Highly concentrated, everything went perfectly with the first LS housing. Since I have an outdoor workshop (terrace) and it began to dawn while milling the second box, I rationalized the steps in the second box. "F*CK!!! I milled into the outside wall..." I could have burst. The biggest mistake a handyman can make: never lose concentration and take plenty of time, I had neglected that. But, don't get stressed, the good putty helps.
Never-Ending Story
Since I'm more of a function-oriented person than a design-oriented person, the next few weeks were going to put me to the test. I thought to myself not infrequently "One weekend of work for full lossless acoustic use, six more weeks for the design" My patience was well tested. I like working with wood but had no experience with MDF to date. So the priming work dragged on into what felt like eternity. Sanding, priming, sanding, filling, sanding, priming, sanding.... A never-ending story. The thankless priming jobs of MDF will not become my favorite work steps in the future. But one thing I've learned along the way: don't save money at the wrong end. I bought the MDF primer at the hardware store. Coupled with unfavorable humidity, the recoat drying time dragged out from 24 hours to seven days.
Now it was time for the varnish. It was to be black-grey. After the experience of the primer, I invested in profile lacquer from the dealer. Since high gloss lacquer should be rather a bad idea the first time I decided for the matte variant. Especially since I like matte lacquers better than the high-gloss ones anyway. And lo and behold... The 3 primer sanding passes served their purpose. Sanded down to a 320 grit, the paint formed a perfect result. The whole, of course, in relation to what a paint roller can give the first time.
Electrifying anticipation
Now it was time, only the electronics solder, clamp and screw. I was looking forward to the first use full of expectations like a little child. The bottom plate (compartment of the crossover) I have not glued for practical / fearful reasons but screwed with M6 sleeves. Who knows... I didn't want to have to break open the glued bottom plate again due to beginner's mistakes by misconnecting the crossover and ruin my weeks of work by breaking it open. Better safe than sorry and I can always glue in an emergency...
The closure
And lo and behold, pride came over me. At this point, at the latest, I had to revise my statement. The weeks of design had paid off. Loudspeakers are not only a purely functional matter. The design underlines the own work nevertheless again quite thickly.
Throughout the build phase, further research made me realize that a good amplifier paired with some decent speakers are just one part of a long chain. So I read through the opinions in the LS forums from Voodoo to Albert Einstein and found the golden mean for me.
My setup:
- Sony 830ES
- Sartorique 3
- SommerCable Orbit 240 MKII
- Music Fidality V-90 DAC
- No-Name Toslink (for Chromecast)
- No-Name USB (for PC)
- Audioquest Chinch
- Tidal HiRes test subscription
There will be no Albert Einstein analysis or other voodoo comparisons at this point. I simply don't have the experience for that. All you get from me is a simple: Baaaaahhhhm, paired with goosebumps. What happened...?
With his eyes closed, Snoop Doggy Dog stood in front of me on stage and rapped. Yes you heard right. Audiophility and HipHop... is that possible at all...? I don't care, Snoop was in my living room and I celebrated him ;) Maybe some would stone me for this listening. But, at the end of every day, what counts is that you go to bed satisfied and fall asleep with a clear conscience. What can I say, the Satorique 3 have done it. That's all I have to say about it.
Thank you very much for providing this project! Many thanks to the professional support of Marcus! Thank you for your staff's exemplary customer service! The Satorique 3 were worth every penny and drop of sweat! Kudos and keep up the good work...!
Many greetings
Hans
Satorique 3Be in walnut
Contribution from Alex
After already two speaker models, I wanted to build myself speakers for the completion of my studies, which will accompany me for at least the next decade, without itching in my fingers to upgrade further. For over 1.5 years I had the project already in the back of my mind and this summer I finally had the necessary time and the financial means to build myself appropriate speakers. From another SB classic, I was already excited about the sound quality and I wondered how these speakers of the upper class would sound. Soon I came across the Satorique 3 and immediately decided on the beryllium variant in black color. Unfortunately, Kerpen is too far away from the Bavarian Forest and after consultation with Mr. Nötzel, who advised me very friendly and competent, I ordered the Satorique 3Be without listening to them before.
Until the components were delivered to me, I went to the hardware store to get MDF boards for the cabinet. However, the board thickness of 22mm was only in stock in sufficient quantities in the third hardware store, the suppliers apparently underestimate the ambitions of motivated speaker self-builders.
Since the front panel was designed with 30mm instead of the 22mm, I just decided to trick it a bit, and bought myself 8mm poplar plywood panels the same size as the front. Since the midrange and bass-midrange drivers also happened to be 7-8mm recessed, I saved myself the precise milling work. For the tweeter, I also made the compromise that it sits a bit too low. In practice, this is hardly noticeable, but if it should bother me in the future, I can always raise it to the front level with a thin bitumen tape.
I precisely pre-drew the intermediate plate and drilled the specified holes with a 1cm drill bit before sanding off any protruding remnants.
The circles of the chassis I milled out with a router, which I had bought cheaply on the second-hand market. Unfortunately, while working on the SB classic, the nozzle for the vacuum cleaner broke off, so I was a bit powdered after the milling work. I replaced a milling compass with a thin multiplex plate, on which I could fix the router stably with screws. After a short pre-milling through the multiplex plate, I marked the radii of each chassis. I fixed the "router circle" to the MDF boards with a 3mm screw, which gave a good hold. Due to the thickness of the material, however, I also had to counter-mill from the back, which caused a little more work, but otherwise worked out well.
Before gluing them together, I drilled holes for the internal cable routing and the pole terminals.
For a precise result, I drew all contact points of the plates with a sharp pencil before gluing. On the subject of glue, I can say that you do need more than you think and I had to buy it before gluing the second cabinet, then for veneering I got myself another small bucket. Some screw clamps and heavy objects built up enough pressure to press the glue joints together. For this purpose, standing around speakers, amplifiers as well as beverage crates were abused, which served their purpose.
For gluing the 8mm front made of poplar plywood I used plenty of wood glue and also used the dead weight of the cabinet.
I decided to glue the back last, which allowed me to comfortably do the final wiring and solder the appropriate cables to the binding posts and crossovers.
With the crossover already soldered together in advance, there was unfortunately a small problem with the mid-woofer, but this could be solved immediately by contacting Mr. Nötzel. Many thanks again for the quick solution.
When the first box was glued together, I did not want to wait any longer and connected it to the amplifier for testing without damping and reflex tubes, while I meanwhile took care of the second specimen. The already here natural and crystal clear reproduction made me want to hear the whole thing in stereo and motivated me to continue.
Finally, both cabinets were ready and I started sanding and touching up small blemishes before continuing with the veneering. With so many different veneer woods to choose from, I thought long and hard about whether I should wrap the speakers in a bamboo or apple tree veneer. In the end, I decided to go for the darker walnut variant, which would give them a more refined finish.
The veneer from SaRaiFo was already attached to a fleece, which made it easier for me to work with, and as a newcomer to veneering, I managed quite well with it. However, I should have taken more care with the edges. Here I was too energetic and sanded off a little too much of the material, which is why the oil could not be completely absorbed later and resulted in a slight blemish. However, this can only be seen up close and is perfectly adequate for my needs. Two sheets of veneer happened to be enough exactly for the two speakers, but this required working without mistakes and without waste.
First, I picked out the nicest parts for the front and cut them out. For the back I finally used the leftover pieces. Before gluing, I moistened the veneer with water for better processing. Then I glued it with white wood glue, which I applied with a paint roller on both sides. After a short drying time, I separated the two sides with a layer of baking paper, put them in the right position and then carefully pulled out the baking paper. Finally, I placed baking paper on top of the veneer and used an iron to apply pressure and heat to the veneer. I pressed the edges extra at a 45 degree angle as recommended and after cooling I was able to remove the protruding edges with sandpaper and scissors.
The raw veneer was still a bit too light for me, so I chose decorative wax from Osmo in the color "Cognac", which I then covered with a layer of hard wax oil.
Now the finish was ready. I was able to marry the drivers to the cabinet and enjoy the full potential of the Satorique 3 Be in stereo, which put a big grin on my face the whole evening. Since sound descriptions are not my area of expertise and this has already been presented much better by others, I will limit myself in the following to some playback tips that tease out some of the potential of the speakers. In any case, after a few weeks, I still recognize details in many songs I know that I haven't heard before or couldn't hear. The Satorique 3 Be converts everything you feed it with simply unspectacularly into sound waves, from the highest treble to the deepest bass. Thank you for providing these great speakers!
They are currently played by an Akai AM-73 amplifier and a Raspberry Pi 3B with Hifiberry DAC+ Pro with Volumio. On the one hand, this enables high-quality music streaming, and on the other hand, I can also access a NAS server with stored music tracks via the network. Alternatively, you can also switch to the TV and listen to, for example, the daytime melody in an unusual resolution.
Here are some more playback tips:
Bastille - Pompeii
The Notorious BIG ft. Ja Rule - Old Thing Back
Crystal Fighters - Boomin' In Your Jeep
Ganja White Night - Champagne
Francis and the Lights - It'll be better
French 79 - Diamond Veins + Golden Times
Two Feet - Go Fuck Yourself
Awolnation - Sail
For the time being I'm equipped with enough speakers, but two friends of mine have already asked me if I would help them to build them.
Satorique S3Be first ascent
Contribution from Peter
How I got to know Satorique?
Through a work colleague who built boxes a few years ago.
I've always read other people's construction reports, which difficulties arose and how they were solved. Everything remained relatively abstract for me, since I have to do professionally much with metal and very little with wood. For a long time I was not clear about two things: whether I could manage it professionally and in terms of time, and whether it would produce what I wanted to hear. After 13 months of reading, doing more important things and thinking, I ordered a kit. Why this one?
Because they left enough breathing air from the deprived air volume of my listening room. There were other alternatives, but they would have restricted the remaining room volume and thus the degree of acceptance by my fellow occupants too much. The résumé of the sound descriptions can perhaps be summarized as follows: Sound overall neutral, neither bass nor treble-heavy, filigree detail reproduction even in quiet tones with a pronounced spatial representation. I like to listen to jazz, classical, blues, pop, often with the instrumental emphasis on guitar, saxophone and organ. In sum, I thought I had made the right choice of partner for me. So I ordered the kit. Quote from the order confirmation "... the last kit Princess would be sold ... deliver or offer something else? ... please contact the customer". Mr. Nötzel did the latter. After extensive talking, listening and asking questions, I ended up with an urgent request for a Satorique 3Be complete with raw beech wood parts. The small addition Be improves the detail rendition clearly and that gave finally the decision.
A few moons later, a handsome package with chassis, cables, switches and wood arrived. At first, I was perplexed as to whether the saying "the whole is more than the sum of the parts" applied to me. With help, many clamps and good tips from the local master carpenter, gluing the box was surprisingly easy thanks to the Lamello taps. By the one who knows about it, in retrospect, I saved a lot of glue and removal of glue squeezed out of the joints.
The prefabricated beech case is relatively stubborn and not exactly flat, the milling work is more than sufficient in its accuracy for a clean finish. Why the front panel and the side panels are not dovetailed with lamellos, I did not understand. I glued the front panels at the end, which made alignment problem-free even without the mortises.
Experience gained with gluing: The glue dries quite quickly. In the next building project I will pay close attention to the clean fit of the components to each other and fix them in this position with clamps. Only then will I clamp the partially slightly bent components flat so that the surfaces wetted with glue lie fully against each other. The slight unevenness of the components is completely normal with wood and can be easily kept under control with a few more clamps. In the first box I kept slight gaps, which I closed afterwards with a glue seam in the throat inside. I closed the gaps that could be seen from the outside using the same process as the voids. Since good professional glue clamps are almost under the table in terms of cost relative to the kit cost, I would never think of trying the same thing with tension straps.
Tip for repairing small imperfections
The individual layers have small imperfections every now and then. I collected the sanding dust produced during sanding. I mixed the sanding dust about 1:1 with glue to form a paste and filled the defects with it. I had to do this twice for one hole, because the paste shrinks a bit as it dries. You can also leave a raised bead beforehand.
Necessary tools: wood glue, sanding dust, old kitchen knife, old plastic ice cream cup.
After drying, the surface is somewhat rougher and must be adjusted to the surface of the rest of the wood by sanding before painting. Of course, the color of the respective layer does not match exactly, because the sanding dust stands out in color rather as a lighter layer. With purchased touch-up putty, you can match the color even better. I build speakers exclusively for the music, not as decorative furniture. I find small color deviations tolerable.
Problem and perspectives through the multiplex panels
The different layers of wood have different colors, of course. Following the woodworker's idea, I sanded the front panel about 10 degrees toward the edge in various places and rounded the edge. This allows you to see different layers of the panel in the front view. The sanding allows you to get a grain effect into it. The box looks waisted by the grinding and the cubic shape gains some elegance.
Now to the electronics: What belongs where on it, which polarity, how and where do I lead the connections to the outside. I searched for pole specifications, markings, labels or whatever. Nothing was to be found. The work colleague told me in passing that a very detailed construction manual was enclosed with his kit. Again, Mr. Nötzel had to help out, the instructions were shortly later in the mail and the problem was off the table and I was able to implement it without problems. Gained experience in laying cables: If you have laid the cables, leave them longer and shorten them when assembling.
The final finish with the hard wax oil is just as mundane and quick as described in the other build report. Completely stress-free to work with, the oil brings out the grain a bit more, and the finish is satin. Wonderful.
Fascination that is hard to resist
I thought for a long time about which piece of music I should use to inaugurate the new Lala. It became the first movement of Bruckner's 4th Symphony, one of the most beautiful pieces of music I know. Two Mockingbirds, one by Katie Melua and one by Barclay James Harvest came flying in and a nightingale by Respighi joined in before Tom Waits tried to mill through the cabinet with Tom Traubert's Blues.
Organ sounds like those of Widor's Andantino from his Fifth Symphony or Hans Zimmer's Guilty of Being Innocent Jack Sparrow helped remove the remaining grinding dust through the reflex tube. If you want the same midrange pressure, give yourself Lupillo Rivera's "Romando Y Tomando" at advanced volume. Why this kit became my choice is rather revealed by the quiet sounds. I call them "transparent" sounds, because I can't think of a more figurative expression. What I mean by this can be heard well in Christina Pluhar's harp in "Pajaro campana" or Beo Brockhausen's "Wolkenmeer".
The tones are put to one's ear in a filigree and floating way, just like the precise voices of Rebecca Pidgeon, Barb Jungr or Marianne Mellnäs. Organ pieces from a sound carrier often have the appeal of a frozen pizza. But if you send them through a playback chain that can reproduce the full range of all stops and agree with your neighbors on a natural volume, they gain a fascination that is hard to resist. In my opinion, the 3Be is unreservedly suitable for such a chain. Other pieces such as Keith Jarrett's Köln Concert did not shake the initial assessment of quality in the slightest.
At the end of the first day Arne Domnerus` "Antiphone Blues" was allowed to run completely. If his majesty reaches for the saxophone, one cannot and does not want to be disturbed. The title of the seventh piece titled the result of the first evening: "Heaven". The reproduction precision remains equally very good at high and low volume. Even for the untrained, the seating arrangement of an orchestra can be determined blindfolded in a good recording. I listen to many pieces again in a new way, as a significantly expanded tonal range makes the pieces sound new. I'm curious to see what else comes up after the recording period.
Two things remain
Respect what you have achieved with this kit. Thanks for the re-education to the 3Be.
The result is what I had imagined - right to the point.