


- Description
- Janex Satorique S1Be
- Herberts S1Rd
- Philipps S1Be
- Matthias S1Be
- Ulfs S1Be
- Jockears S1Be
- Illgners S1Rd
- Reiners S1Be
- Markus' S1Be
- VII S1
Satorique S1 - Compact reference
Why yet another Satorique 2-way box in a large bookshelf cabinet, when there are already two of them? That would be the question attentive readers of this website should ask when they see our new Satorique 1. Of course, there is an answer to that, and it's actually quite simple:
The Satorique 4 set a new standard, the Satorique Center continues it, the Satorique 3 built on it, and now come smaller versions at a comparable level.
Reference quality shelf speakers. Why not as a kit? Custom-made for you!
A question arises: Is it possible to build loudspeakers on the highest acoustic level at home on the table instead of in the tinkering room and thus without special tools? And whether that is possible, here you go:
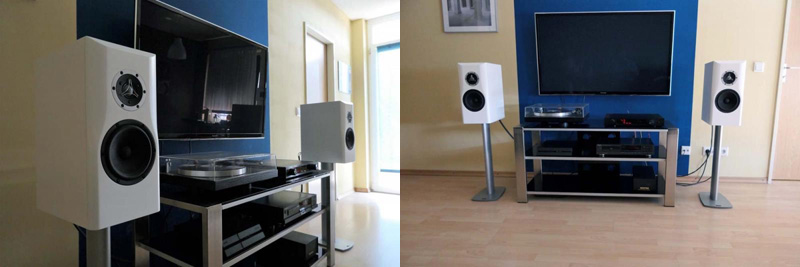
Welcome to the Show: "custom-made" high-end speakers in a living room-friendly cabinet.

The arguments against do-it-yourself loudspeaker construction are quickly debunked: I have no tools, I want a reasonable appearance, I also have no wood knowledge in terms of processing ... and are also refuted just as quickly with our construction manual. In order to get an objective impression ourselves, a self-experiment was started and we built the boxes with the simplest means.
A last argument, namely to reach the technical level of high-quality ready-made speakers, has virtually taken care of itself in recent years through consistent further development of our crossovers and our speaker design. Our drivers and components have always been among the best that the market has to offer.
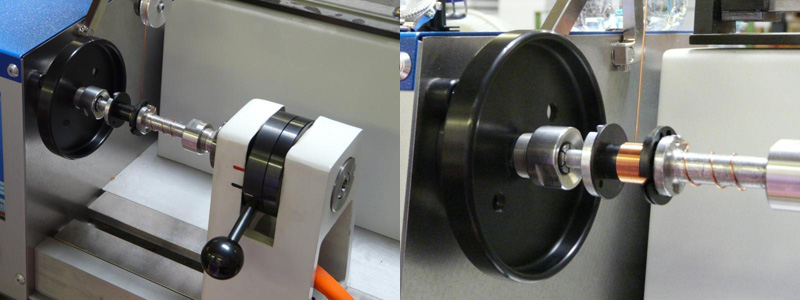
The ability to access a wealth of resources from within the company as far as the development of new turnout components is concerned, and to manufacture a new coil from scratch in a day, makes it clear what opportunities can arise when electroacoustic knowledge and, in particular, professional know-how in turnout development are added. And the whole thing has continuously developed in the right direction over the last few years through meticulous optimization of the kits. Now the result is an acoustic puzzle that is almost compelling to use the high-quality chassis of the Satorique family in perfect conceptions.
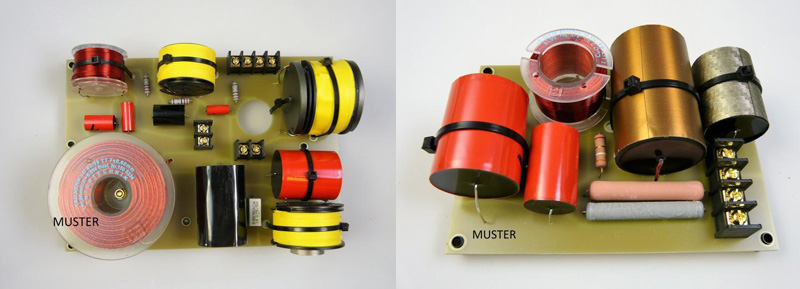
Finished crossovers in manufacture quality
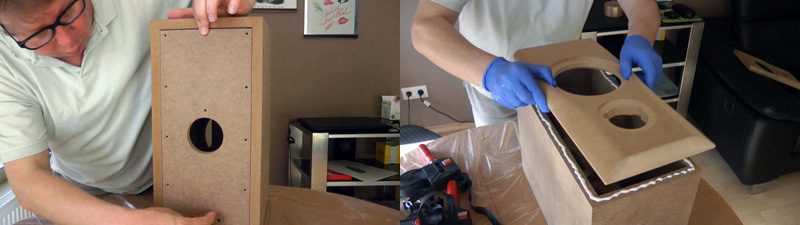
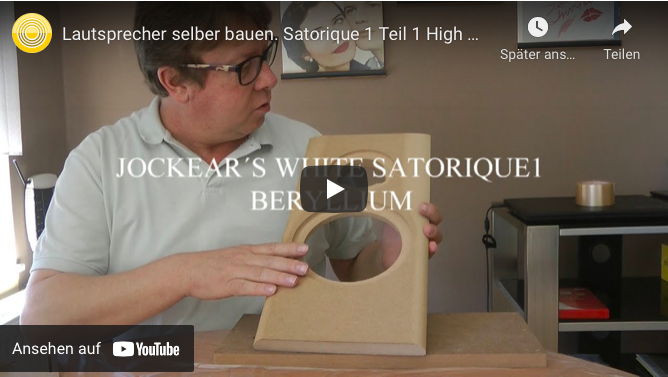
For self-build novices: In the film about the construction of a Satorique 1 / BE you can see for yourself whether the construction of a high-end speaker in the form of the Satorique 1 appeals to you. At the time of filming, the final crossover layout was not yet ready. Finished crossovers of the best quality replace those built in the lab. The connections take place via screw terminals on the crossover among themselves, which further simplifies the matter.
From custom-made to DIY, everything is possible
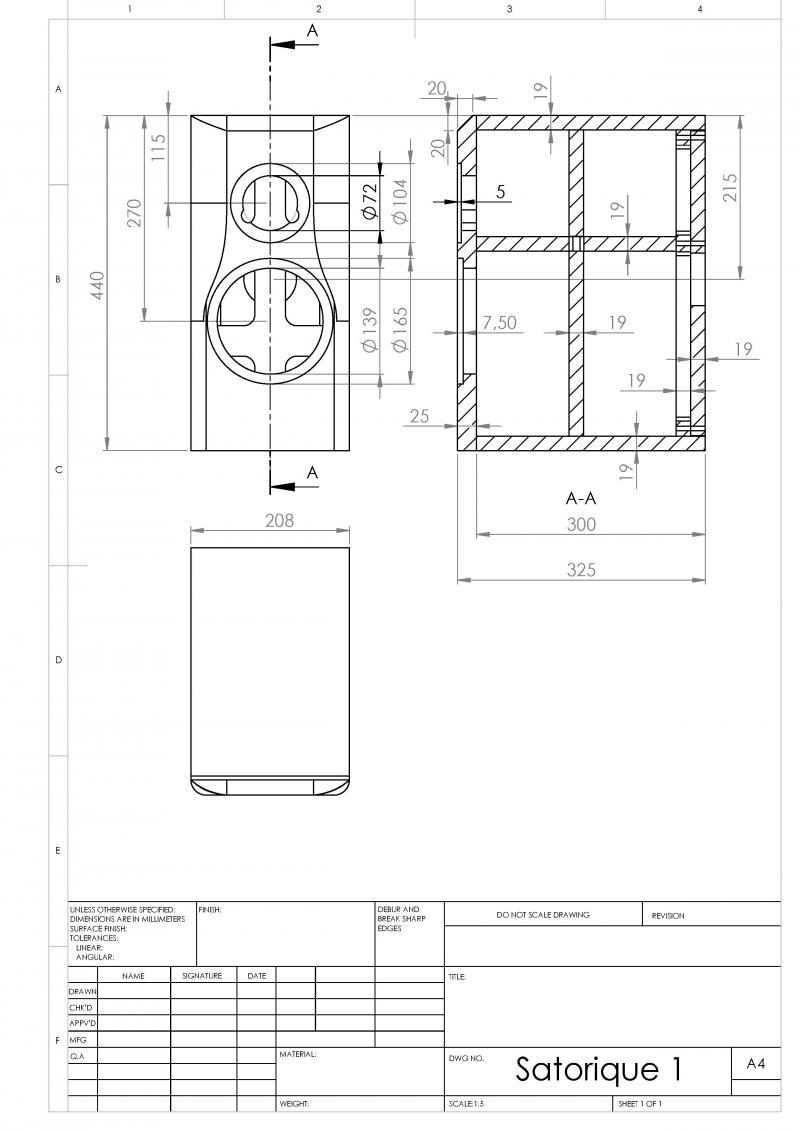
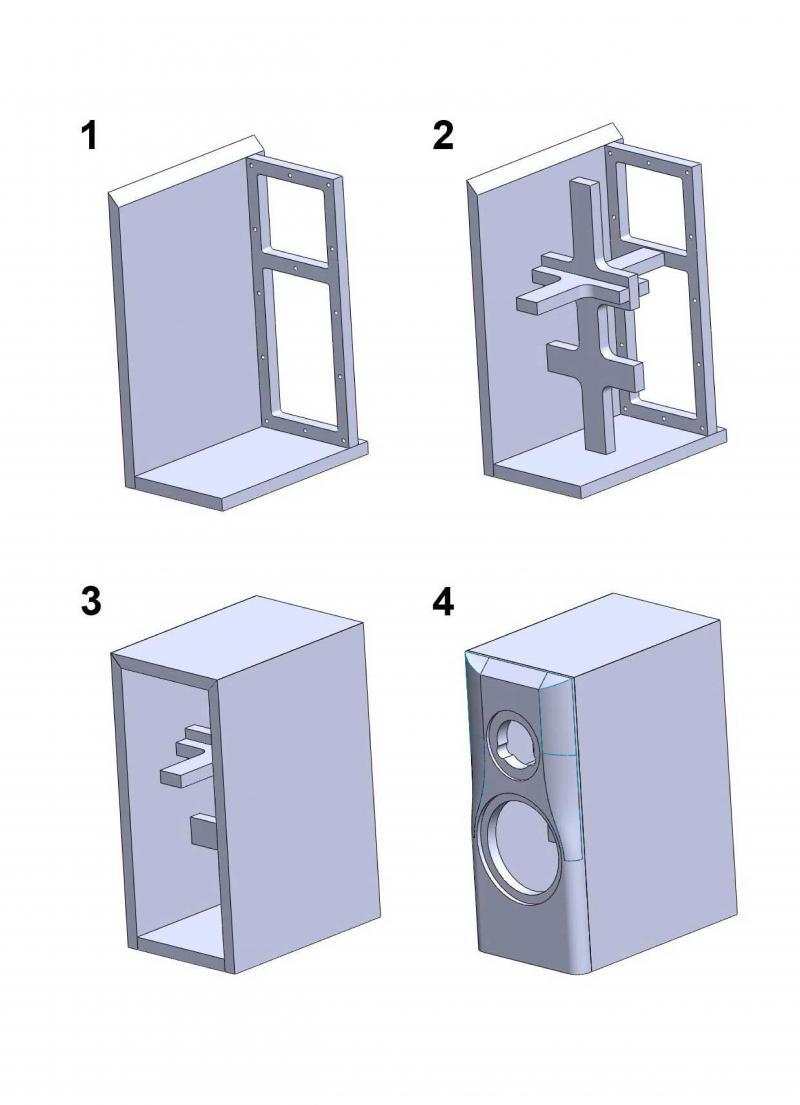
For the cabinet construction you have the choice. Fall back on the ready-made housing, the complete speaker wood cut, on the 3D front wall milled by us or build the speaker completely yourself in the classic DIY manner. For this purpose we offer you the technical drawing for the cabinet construction as PDF in professional look for download. If you have another idea, please contact us, we will find a solution for your customized high-end speaker.
Not convinced yet?
In the film, Jockear explains the assembly of the housing kit in a self-experiment. The assembly instructions in picture form are also provided here, should something remain unclear in the film.
The film consists of two parts:
Part 1:
- Dry assembly of all speaker parts. Please make sure to do this, so you will quickly find out if something is missing or will be a problem in the later assembly!
- The actual cabinet assembly with final evaluation of the assembly.video
Part 2:
The assembly of the crossovers and chassis into the cabinet.
Many questions settle themselves through such a film and contribute to a successful construction of the speaker. That the fun is not too short, you can see clearly, and so all prejudices against the self-build compared to the prefabricated box scene melt.
The drivers - an uncompromising decision
The large shelf speaker - the new Satorique 1 reference - has been designed with the objective of becoming a small Satorique 3, a real Satorique for smaller rooms and for lovers of compact speakers.
The basic conditions for the Satorique 1 were therefore fixed: uncompromising, compact and beautiful!
Then it was time to select the drivers. The choice for bass-midrange was the 4-ohm and the 8-ohm version of the SB bass-midrange driver in 6.5 inches. The drivers are almost equal, but if you ask the question about a compact speaker, then you also have to ask the question about the quality factor of the woofer, so that the speaker later convinces in the fundamental as well as in the bass range.
Since we're talking about the maximum here, the 4 Ohm wins on the subject of installation quality, which is particularly low at 0.27. When considering amplifier compatibility, the 30 year old reference amplifier will not be able to give everything at 4 ohms, but today's amplifiers as well as the use of particularly low resistance and rather short speaker cables again clearly speak for an impedance of 4 ohms.
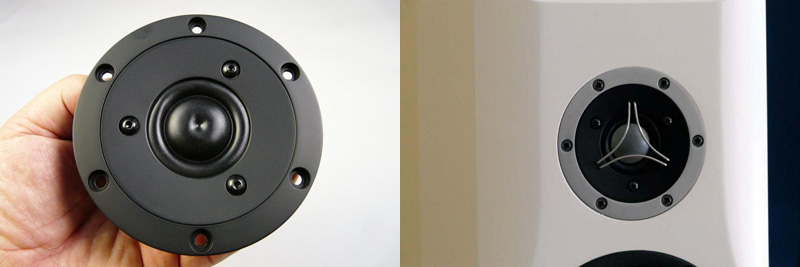
With the tweeter it is simple: Above the beryllium dome there is nothing more, this dome can play everything and shows relentlessly whether it is wired with the right crossover components. Just pay attention to the finished products in which you see this dome everywhere. And what the trade press writes about it. The choice between black and silver front is up to them.
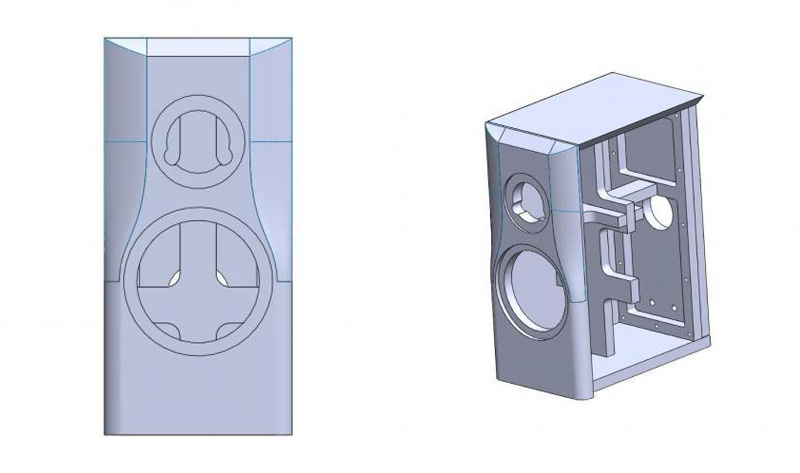
The case design - an asset to any living room
When it came to the cabinet design, there were understandably quite a few specifications in order to continue the design line of the Satorique 4. The placement of the tweeter dome, the chamfer and the rounding, everything must be virtuously coordinated so that the high-frequency range is perfectly detached from the speaker. The baffle simulation helps immensely for optimization in advance.
The volume has to be a good compromise between a lot of air and small cabinet dimensions. So it's no wonder that the Satorique 1 has a similar volume as its predecessors, which could also already show the potential inherent in the Satori drivers. Finally - who would be surprised - the cabinet is really well damped, as is usual for top products in the speaker scene. This increases the bass performance and minimizes the distortion factor in the fundamental and kick bass range.
... with great attention to detail
For a special stiffening with simultaneous installation comfort, the kit was elaborated by us with great attention to detail.
We are particularly proud of the housing design and look forward to numerous customers realizing their own Satorique 1. This results in a multi-faceted line that encourages many people to build their own. In our modern times, we are satisfied with a few lines about the build as well as a few pictures, and new readers are happy to receive authentic testimonials. Writing a detailed report is not everyone's cup of tea. For those who do it, thank you very much for the great effort - I know very well what I am talking about.
For maximum liveliness, the damping in the cabinet must be minimized without resonances in the cabinet interfering with the midrange. An ideal cabinet calculation, Bitumex, and not using a lot of damping material are all part of our optimization process. "Less is more" hits the mark here.
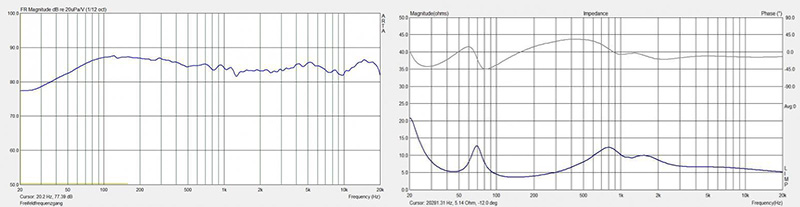
So, and now the actual development of the speakers is just beginning: Up to this point, everything is simple and yet gray theory. The development of the crossover starts in the classic way with a theoretical analysis or calculation and the goal of achieving the most linear frequency response possible on axis with as few components as possible while taking the acoustic phase into account. This works perfectly with a third-order crossover, so that the midrange, the transition to the tweeter can be perfectly leveled and the acoustic phase also fits.
So set up and listen: The first attempt was not convincing. Well, I really expect more from a Satori speaker, too hard in the sound image, too striking the bass and the presence area emphasized.
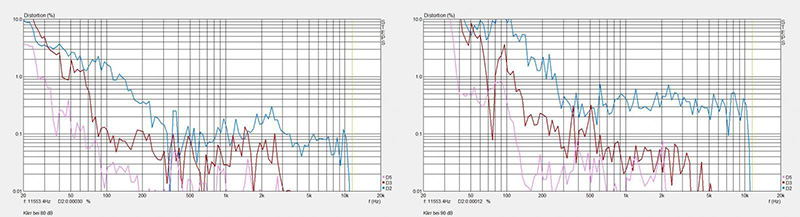
The measurements for this look fine for an ordinary loudspeaker, but the distortion factor is still a bit too loud in the mid and high frequencies, this could certainly be better. So next we tested shallower filters in the passive crossover: a first order crossover circuit and the necessary additional circuit for linearizing the crossover and suppressing resonance effects of the speaker drivers.
And the result? The sound seems more balanced, the "distortion" drops significantly so that it remains exemplary low even at 100 dB.
Good for now. However, the midrange still lacked some presence in the listening test, and the clarity still left something to be desired. This raised the question: What else is possible?
What was the crossover of the Satorique 3 like again?
A circuit with a frequency response correction or lowering of the surround resonance was the solution of choice. So we tested this correction circuit. Of course, for this test the crossover was built with low-loss capacitors Audyn, so that everything is transmitted relentlessly and all errors of the crossover and the drivers are audible.
The final result is the total hammer, so really present the performers stand in the room and perform their pieces. That's what I wanted to hear, nothing less, only that is for me an uncompromising sound result and no wishy-washy.
The further listening tests with different music, with TV and Youtube were really good, all frequency bands are present, all qualities of the performers can be heard, all emotions can be felt and of course the shortcomings of bad recordings are unmistakable.
Thus, we have brought the construction to the point: a Satorique 3 in small. Now we are talking about another box: a Satorique 4 in Klein. Not so merciless and still playing everything without leaving anything out. A Satorique 1 with "edge smoothing" - one would say with a 4K TV, which is, after all, also high-resolution in its picture world.
For the "tamer" version is built on the existing Satorique 1 BE, in place of the beryllium dome, the Satori Ringdom with neodymium drive. A tweeter that stands out positively both for its precision and a softer brilliance range. Acoustically, it is a middle ground between a fabric dome and the beryllium dome.
The crossover of the Satorique 1 BE is not completely adopted, this is also adjusted in its presence, so that the Satorique 1 RN plays a shade softer throughout the frequency spectrum.
Thus, two Satorique speakers have now been created, completely in the line and quality of the great models of the Satorique 3 and Satorique 4.
Total control in all pitches
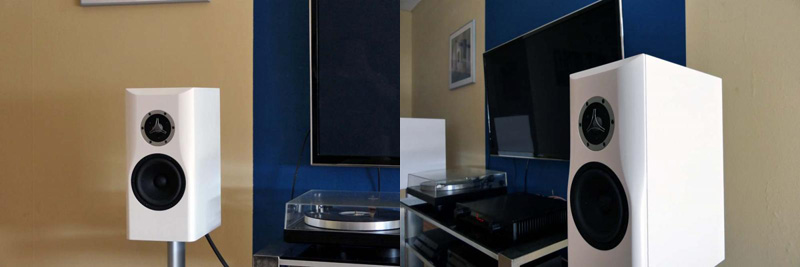
... you can take that literally. For me, the Satorique 1 is clearly the highlight of the year: a two-way speaker that gets louder evenly in the mid-high and bass range with increasing volume, nothing thickens and bloats, always convinces sonically, reveals everything without being over-analytical.
A Beryllium or also the Ringdome that performs in a concrete building with sparsely furnished furniture without being annoying (Jockear's living room). You can turn it up without compromising speech intelligibility, and it surprises me in my 33 square meter basement living room, where the drywall produces its own pitch that swallows everything around 100 Hz and makes even speakers from the "largest caliber in the bass range" collection look old - you would actually need more diaphragm area.
Thus, the Satorique 1 is more than a speaker for classical music lovers who prefer two-way systems, but also for everyone else, because it plays punchy without distorting, offers a listenable sound volume and transforms the spatiality of a large hall into the living room at home.
Musicals, even if you don't hear them often, can be so much fun when the Beryllium brings out the last of the Phantom of the Opera in the alternation of voices. It doesn't get any clearer than this, but beware: you pay for so much clarity with so much worse results when the music material doesn't play along and the recording just doesn't deliver.
The result of our new development is total control in all pitches - that's how I would put it - without losing the lightness and without bringing disturbing harshness into the action.
Taking the tweeter back nice and sweet to mask everything was not an option, by the way, because: What a shame that would have been, to create an all-rounder that would mask everything!
And only the behavior in the home theater: If you can live with a bad recording at the Beryllium and turn a blind eye (ear), the home theater world is fine for you, otherwise please rather reach for the Ringdome tweeter - well mixed movies sound totally realistic, badly mixed ones are exposed relentlessly.
Unfortunately I won't get to rave so often, at the moment there is nothing in sight except our tin and copper capacitors - did I make a mistake and meant the chassis? Those too, of course!
But the heart of a loudspeaker is still the crossover. A cheer for analog technology: It is alive and well and simply cannot be broken, otherwise something would certainly be missing: constructions like the Satorique 1 BE with its enchanting flair.
We always like to realize such projects because it's fun. Now you may give the Satorique your own face.
Why the Satorique S1BE ?
- I was looking for a very good price-performance ratio, but also uncompromising sound.
- Ready-made speakers are tightly calculated and everyone wants to earn something from it.
- My consideration was to build a part of the speakers themselves to save money and not to have a product "off the shelf".
My research led me to various DIY sites. But I was convinced by the www.Satorique.de of the company I.T. Intertechnik. Everything is nicely structured, according to budget and also pictures and construction reports are available.
That's how I had imagined it. Especially the Satorique 1 appealed to me, with its beautiful front and the compact
dimensions. On Youtube I was able to get an even better picture of the construction of the box and built actually from
cardboard a sample box to see if this would be visually well represented on the sideboard.
What can I say, it looked great....
How did the order proceed ?
I contacted the team and was shortly thereafter advised by Mr. Nötzel by phone. After a very friendly conversation and various questions and requests (housing ready built and painted black matte) on my part I got an offer and the price named. This was followed by an order confirmation by mail and the payment modalities. All in all uncomplicated, fast and professional. The delivery time was about 4 weeks, delayed by the painting, which was no problem in times of supply shortages and Corona.How is the box constructed ?
The order was accompanied by a construction report, which I studied diligently and then set about building with my two left hands. I had the case assembled by ready and painted black matte, for an additional charge.
In the hardware store, I got myself some "glue instead of drilling" and fixed the Bitumex plates in the housing after cutting them to size. Next, the crossovers were placed in the appropriate places and screwed. So far no big deal.

The soldering turned out to be rather difficult, but after some practice on some old cables I got that also quite well. The instructions take you by the hand and the one additional blue cable belonged to the positive pole of the woofer. Afterwards the rear panel was folded up and screwed. The last step was to insert the sonofil and to align and screw the drivers.
Finished now two beautiful boxes stood before me with a stately weight.... but with the huge high-end crossovers no wonder.
The sound:
The boxes were placed on a fairly stable heavy sideboard with TV in the middle. About 1.8m apart. As decoupling serve a kind of rubber absorbers under each box. The seating distance is 3.5m. So not a classic stereo triangle. Also the room and the near wall (20cm) placement are far from optimal.Connected to a NAD M10 amplifier I listened to the first sounds and was thrilled how clear and precise this box plays, even without optimizations.
But after I had calibrated my room with Dirac Live 3 and especially in the bass range of the room frequency response cultivated, I could hardly believe what came out of these boxes. It's amazing how you can feel the emotions, the bass and what kind of atmosphere is created in the living room. The box copes with any material and plays effortlessly from the bass cellar up to the finest heights. You can hear the qualities of music and well-mixed movies super out. I think without calibration, but with better placement comes out the same.

Conclusion:
I've had my eye on this box for a long time and regret that I didn't buy it sooner. For me it is an added quality of life to be able to listen to music and watch movies in this quality. I thank the entire Satorique.de team for this great kit and especially Mr. Nötzel, he has answered my questions with advice and action.Nature in its noblest form – Satorique 1
Report from Herbert
Nature moves in again
After I had already tried my hand at another speaker in solid wood and this experiment worked out so wonderfully, another pair of speakers in natural wood should now follow, the Satorique 1 RD.
Why I generally build speakers with solid wood? My wife is not entirely uninvolved in this. She was right when she criticized my lacquered MDF versions because of the insulation, priming and lacquering, since I did all this with synthetic resin lacquers. In addition to a great development of odors, it is certainly also an equally great environmental burden. But that's over now. My loudspeaker future belongs to solid wood or solid wood panels and only wood oil will be used as a coating. The price difference is also relative in the end, because the paint components and the tools for painting are also quite expensive.
Wood cutting, planing, sorting and gluing
The last box I had made in ash wood, for the Satorique 1 now the rest of the cherry was refurbished. So noble wood for a noble speaker! In fact, it was then that the manageable stock of our cherry wood was really needed completely. At times I even doubted whether the wood would be sufficient, after all I had to cut away quite a bit. For the front elements, I managed to prepare at least one reserve element, as well as an additional outside.
I know, cherry is currently not a topic in living areas, just as little as beech. The reddish-brown wood tones that dominated the furniture market for a good two decades have had to give way to the grayish-brown tones of oak, due to trends. But our furniture is still from the time of beech, walnut, apple tree and also cherry and the furniture is still in perfect condition and we are not thinking of changing anything in the next few years, except maybe that I change the plastic parts to real wood. And one day, the heyday of oak tones will also give way to reddish-brown tones again, or maybe just natural wood itself, in whatever form, will become the next trend.
With solid wood boards, it is necessary to first cut open the available wood boards, after cutting them open there is a first rough sorting of what I might take for which component. In general, sorting accompanied me throughout the preparation process. As I said, the cherry wood available was a precious commodity.
Then the wood was planed, again some parts were re-sorted, because the bottoms and backs can tolerate small mistakes, the fronts, the sides and the lids should be as perfect as possible. Close, but still, I got the parts together. The cut wooden parts were finally glued again to plate elements, with the sorted sizes, for the needed parts and just with a reserve front and an additional side part, which I then but still needed for 2 lids. But more about that later.
Precise cutting of the components
The next step was now to cut the glued panels to the exact component dimensions. Even when cutting, I was very precise this time and constantly checked the dimensions and the angles.
Carcase connections- miter milling and flat dowel connection
Furthermore, I initially focused on the bodies and the interior stiffeners. The reason I needed my spare element, an outside for two new lids was that this time the miter routing was not quite as smooth as it was on my last speakers. I had set the 45 degree bevel too close to the edge of the wood, now the milling took off a touch too much by about half a millimeter. My too exact adjustment was to blame and actually I should still know it from my first speaker builds, because in the beginning this also happened to me. You must not set the milling depth exactly to the edge, there should still be about half a millimeter of straight edge left.
With the carcase elements, there wasn't that much missing after the miter cuts. Yes, except for the connection milling for the flat dowels, then these parts were done for the time being.
To the interior of the Satorique
Building the Satorique 1 is not such a simple task now, there are quite a few hurdles to overcome. These internal stiffeners look easier than they actually are to build. Sure, you can't see them later, but I still wanted them to be cleanly cut. At first I even thought of milling the recesses, but in the end the effort was too much for me. A precise cut with the jigsaw should be enough. And so it was, the cuts in the hard beech multiplex boards turned out quite well, then a little sanding and ready were the relatively complex stiffeners, which then took a whole afternoon. After these parts were finished, I was looking forward to the "dry" assembly of the body parts and the internal components. I waited with the gluing, for the first time I turned to the front parts.
Whether the interior stiffeners, to this extent, are necessary for my solid wood version? With solid wood probably not, but the efficiency of the bass-midrange driver is already impressive and generates a lot of pressure. However, I only noticed that after the first sound test. So with MDF I would not do without the stiffeners.
Chassis milling with the milling compass
The chassis milling went perfectly once again, so also in the cherry wood. Milling through the openings was then but on 4 stages of depth adjustment. This is no longer quite as easy in hardwood as in MDF. And you really have to be very sensitive in this milling process, especially for the sake of the router, because I only have this one 8mm groove cutter, which then actually has the required useful length to mill through this 25mm front.
By the way, the small recesses for the solder lugs from the tweeter I drilled this time before milling. Afterwards, these small half-rounds can only be done with greater effort, but beforehand with a drill - it works fine! I drilled them according to plan and yes, they fit!
Front contours of the Satorique series
The second and the emotionally bigger hurdle was the profile milling of the front, i.e. the large softened curve. Because although I have a large selection of profile cutters for our table router, there were no profile cutters that were suitable for this and I also found in my favorite stores for machine tools, no suitable cutters, except perhaps so-called Abplattfräser, but with these the profiling was too flat. I then remembered the softened curves of furniture fronts, late 90s. But where should I get such a cutter now? The alternative was to simply mill a 20mm round and grind the rest manually, with a hand belt grinder. My first attempt on a test piece was promising and it went much easier than I thought. For the belt sanding, I used a 60 grit, so that I could see success right away, in the hard cherry wood. So much for the test piece, but now it was time for the original parts. And yes, with the coarse grit it worked wonderfully, then sanded with a finer grit and the contour was finished. The contour was really a hurdle for me before, because I thought that it will not be so easy to produce without a special cutter. So now this little hurdle was also overcome.
Gluing the carcasses
The use of flat dowels provides stability for gluing, especially for mitered carcase joints. If I always used tension belts before, I tried it this time only with screw clamps and I must admit, it went better. But only if you always tighten the screw clamps fairly evenly. If you tighten the first screw clamps right away, even miters with flat dowels slip, because the clamp then has no counter-tension. Because the internal stiffeners were also installed and glued at the same time, I had no problem with the angle. Finally, I let the gluing dry overnight.
After I had freed the carcasses from the screw clamps the next day, I worked on all sides with the hand belt sander. After sanding, I could put the fronts on the carcasses for the first time to see if everything fit so far and- yes what can I say, they looked great. The contours, that is the millings make a lot out of a cuboid speaker and make the front look wider than it is. Now that these contours were finished, I had to admit, I liked it a lot.
The last work on the housing
Okay, what was missing now? The fine sanding of the surface, the gluing of the fronts to the carcasses, the surface finish in the form of organic white oil and, yes, of course, the kits are still missing. Before the final sanding, I wanted to test fit the chassis into the fronts to see if they would fit snugly into the recesses.
Until the kits arrived, I first looked for a suitable speaker stand and even that is not so easy once you have read up. I didn't want to take any chances with the load capacity, the stand tube(s) should be made of stainless steel if possible, and the possibility of attaching spikes is also worth considering. Some also offer the possibility of screwing the speakers to the stand plate. If there is no screw option, most recommend fixing the speakers with double-sided Velcro tape. Because of a safe stand and the possibility to fix speakers, I finally decided to use a stand with 2 columns. Or let's say so, in the end I decided more for the safe stand than for the design, however, the black stands just fit sensationally to the speakers.
And in the meantime I decided to glue the fronts to the cabinets already, as they say in Austria "it will fit". Well, hopefully, because the chassis recesses are milled very precisely. So the front elements were glued on, everything was sanded again very precisely and then both speakers were wetted with water so that the fibers could straighten up, which then also had to be sanded down after drying. But now the surface was ready for the finish. This time I used white oil. I tried around a bit with classic wood oil and just the white oil and with the white oil the surface kept the typical cherry color, it looks pretty much like natural cherry wood. With the classic wood oil, the cherry drifted too much into a reddish-brown hue for me. Where the white oil leaves too intense white traces, like on the edges, you just have to wipe more intensively, then they disappear almost entirely, if you want it that way.
Delivery and installation sample of the kits
On a beautiful and cold December day, the parcel service finally arrived with the kits. I was very pleased that they arrived, although I had not expected so quickly. But I was already so far advanced with the construction, that now only few handles were necessary, until the loudspeakers stood ready in my workshop. And the drivers fit perfectly into the cutouts - I was relieved!
Cutting and gluing of the insulation boards
The enclosures were now fully prepared, so I started gluing in the insulation boards. The insulation boards are a bitumen material and are very tough when cut. But similar to plasterboard, you just need to cut it on one side and then you can bend the board down, which works quite well. For the dimensions, I followed the video from the construction of the Satorique1 and also cut the insulation boards with a width of 8cm. And unlike the suggestion of Marcus, in the video, I have used no glue, the insulation boards have a self-adhesive coating that holds extremely well, at least on my cherry wood.
Installation of the technical components
I then began installing the technical components, screwed in the connection pins, attached the low-mid crossover to the bottom panel and the high-frequency crossover to the rear panel. Then soldered the red cables of the crossovers to the solder lugs of the connection pins. Ok, of course I shortened the cables to the needed length before, just like the chassis cables later. The rear panel could now finally be closed. Also here you have to be careful that no cable gets jammed somewhere. Now the rear panel could be screwed together. I used stainless steel screws for this, although it is possible that I still change them to black screws. Whereas, they are in the back, so you can't see them or only if you show the back to someone. But since everything else is in black, that would probably fit better too.
I already pulled the cables for the chassis through the right openings. With a cable I was not quite sure at first, but my guess turns out, after a short phone call with Marcus, as correct. Namely, a blue marked cable went from the tweeter crossover. This actually belongs to the positive pole of the woofer and it was marked as blue cable, also for this. For all who are also unsure, like me, do it exactly the same way, it works! Also solder the 2 cables marked with blue line to the positive pole of the woofer. After I soldered all chassis cables, I only had to screw the chassis into the cabinet. I aligned the chassis with an angle and oriented myself to the screw holes. So that was it!
Sorry for the (non-existent) photos of the installation of the components and soldering, but the day was already advanced and I really wanted to hear them!
Successful first listening test in the workshop
What comes now surely knows all! Now comes what you wait all the time, the first sound was only a small step away. I made a first test still in the workshop, because if something would still be to correct, I could still make this in the workshop. So, I connected the cables from the amplifier in the workshop to the Satorique and off I went. I had already thought very carefully beforehand which songs I wanted to hear first from the Satorique and right away the Satorique owned the stage. "Walls" by The Lumineers, "No Mercy" by Joseph J. Jones and they were standing right where I was standing, in the middle of my workshop.
I played several songs, across my playlist, yes and what can I say- perfect. They showed no weaknesses right from the start. They played sovereign right away, even difficult bass-heavy titles, like "Come out and Play" by Billie Eilish. I didn't want to test this song at first, because so far every speaker failed with this extreme bass and I didn't want to be disappointed. But what am I saying, the Satorique played this song with aplomb as well, but not until I put them on the stands that decoupled them from the floor, or previously from the workbench. "Movement" by Hozier is also such a bass-heavy song that demands everything from speakers in the low frequency range. But not the Satorique!
Conclusion
If you have the machines and tools, building the Satorique 1 is a wonderful task every second, because you're looking forward to the finished product all the time. If you have limited machinery and tools, consider a prefab kit, although materials like solid wood are also an exciting challenge. At the self-build is definitely the way the goal, the construction itself is the goal, which then ends with the finished highlight. Yes, unfortunately it ends and with one laughing and one crying eye. Of course, the joy of the finished product prevails, but the construction itself is fulfilling and exciting, where I forget space and time and I lose myself completely.
And there they stand now. I must confess, everyone finds them beautiful so far and the reactions from the private environment, that makes one naturally already a great joy, although the beautiful noble housing is at least as important to me as what comes out of the speakers.
I wanted to build them in this noble wooden dress, as it simply befits the Satorique!
Tip for optimization
I already mentioned in the sound description that it was much better to place the Satorique on a speaker stand with spikes for a bass-heavy song, because strong vibrations could be heard on a support surface like a workbench. So I recommend to put the Satorique on a platform that decouples it from the floor or a shelf.
Since it is also always necessary with spikes to place them on shims and these shims are always loose on the floor, I prepared a base plate into which I milled these shims flush. Thus, they are fixed in a plate and only need to put the stands with their spikes.
Satorique 1Be
Report from Philipp
After reading various build reports for some time, especially on this website, and watching the YouTube tutorial on the Satorique 1, I decided to go with the Satorique 1 Be because of the size of my room. Lacking woodworking experience, I ordered the complete kit.

A speaker box unfolded - facilitates the correct placement of the lamellos.
The gluing was then done without any problems with a pair of miter clamps, simply wipe away the swollen glue properly, then you do not have to rework so much before painting, especially with the shadow gap this pays off. This was the beginning of the search for the right paint. A painter friend of mine recommended alkyd resin varnish and a few brands for the undercoat and topcoat. A local specialty store sells Sikkens lacquers, where I had the desired color mixed in high gloss.
Result after the second coat with the undercoat. About the good opacity I was very pleased, about the flies attracted by the orange color and stuck to the fresh paint, not. However, moving it via basement (poor light) to garage minimized this problem.A few coats later. The edges still need some paint on the left. In total, after a short sanding each time, the undercoat was applied 2x and the topcoat 3x. In the right picture, I was then briefly unsure, because both in the blueprint, as well as in the construction reports, the hole for the bass reflex tube was found further up. A brief consultation with Marcus Nötzel confirmed my hope: the design of the box was slightly changed and I could begin with the insulation.

Two Bitumex panels are provided per speaker, except for the surfaces for the two crossovers, everything is glued as well as possible. The Bitumex is easy to cut to size and with the "glue instead of drilling" from Pattex it holds very firmly.
So now it can go to the installation of the crossovers and to the wiring. I was initially surprised why the cables were chosen so long. I advise further rebuilders to consider how the cables run, so that you can still open the box when the cables are fixed soldered.
It is also important that the "remaining" cable must be soldered to the positive pole of the woofer/midrange. First I screwed the crossover for the tweeter on the back plate, the measurement for this is self-explanatory and can be seen well in the video.

In addition to the Bitumex, the speakers are also insulated with Sonofil.
The soldering of cable and speaker is straight forward, black is always the negative pole and is connected to the unmarked cable. A bit exhausting to solder was the tweeter, which liked to attract the magnetic soldering iron, but fortunately did not suffer any damage. The screwing also worked well without pre-drilling.


So I could test the first speaker box. Connected, volume set to minimum, Dream Theater - Untethered Angel put on, tensely turned up louder and found that both speakers work. And how! During the first run-through I concentrated only on the drums, I have never heard them so clearly and precisely. Impressive, on to the second speaker. Here everything went much faster and so I could connect both speaker boxes to the amplifier after a short time.
No matter what genre, my girlfriend and I were thrilled with the atmosphere the speakers create - you feel like you're sitting in a live concert. It was fun to set up, I was able to learn something and I'm looking forward to an even better sound after the break-in period.
Satorique 1Be from Matthias

Hello Mr. Nötzel,
enclosed are the pictures of my loudspeakers.
It was the first time I tried my hand at building speakers, but thanks to the prefabricated cabinet it was really a breeze.
I'm still fascinated by the room-filling sound that comes out of these little speakers. It's amazing how accurate the treble and midrange are, and that's despite the fact that I'm only running them with an inexpensive AV receiver.
Previously I thought I already had good speakers, but what comes out of these 2 Satorique speakers is a completely different league.
Thanks for the great speakers.
Greetings Matthias


Ulf's winter project Satorique 1BE
Contribution from Ulf
Hi Marcus, I finished this winter but am just now getting around to writing to you.
Here are my notes on building the Satorique1BE. Put all the boards together to see if it fits. Distributed the struts asymmetrically, making sure there is enough room for the bass reflex tube and drivers.
Priming with Hesse Pur insulating filler DP 4777-9005, Hesse-Lignal Pur hardener DR 4071. This is the only weak primer for MDF that I have found.
Make sure that you do not use PU acrylic varnish, which can never be sanded again and is much too hard. Normal acrylic lacquer is better.
For the baffle groove, I brushed another strip of black on the face of the side panels, here the masking tape is already peeled off. The cut veneer sheets. Ordered in the bay, arrived as a roll.
Wood glue applied to veneer, wet veneer outside with sponge, then turn it over and
brush the inside with wood glue. When the other side is wet, the veneer does not roll, but remains relaxed.
Left only veneered, right already once painted. With wiring and Bitumex.
I have treated myself to drive-in nuts. In case I ever have to dismantle the chassis. But it's a lot more work than wood screws.
To match our furniture, I chose walnut veneer and the black front.
Many greetings,
Ulf
Jockear´s white Satorique 1Be
Report from Jockear
Hello everyone to the next part of the review of the Satorique 1Be!
Of course, when you build a speaker like this, you have a high expectation for the sound. Was the investment and all the work worth it?
First of all, for a better understanding, I would like to tell you with what I listened.
Turntables:
Linn Basik + Akito + Audio Technica ATF2.
CD player:
Technics SLP202A, already getting on in years.
Amplifier:
Restek Factor
Cables:
Tritec
What does she sound like?
In my 18 sqm listening room, the speakers are on a stand, with a base width of 180 cm. They are angled very slightly towards the listening position, which is 250 cm away.
After a few days of play-in, the first thing I picked up was my favorite singer, Mary Chapin Carpenter. Her voice came across clear, fresh and expressive. Her "Come on Come on" from the CD of the same name was calm and tenderly melting. She has never breathed it into the microphone so beautifully. Thus taken, I tried another country voice. Natalie Maines of the Dixie Chicks. Her voice can be annoying on high notes. Not here it isn't. Her voice is free of any edge. On "Travelin Soldier" from the LP "Home," you can feel her grieving and suffering. Even the violin at the end of the song no longer croaks, but rounds off the whole perfectly.
Video: Mary Chapin Carpenter - Come On Come On
We continued with music of the harder kind. I'm not a heavy metal fan, but with Rainbow and Uriah Heep you can really let it rip. With "Kill The King" by Rainbow it really goes off. You can follow all instruments. No matter if bass, drums or guitar. It doesn't melt into a mush, but is finely resolved. Whether you want to follow the bass runs or the filigree playing of Ritchie Blackmore's guitar playing. All no problem. This is also the case with Uriah Heep's "July Morning". It's a pleasure to listen to the keyboard playing, as everything is precisely resolved and nothing sounds aggressive.
I don't know about you, but I sometimes buy a record where I only like one or two songs. Katie Melua is such an artist. I bought "Life at the O2 Arena" only because of "Two Bare Feet" and "Spider's Web". After listening to those two songs, I decided to listen to the whole LP. I didn't regret it. Because of the precise, calm and balanced way it is played, it was a pleasure to listen to her and her musicians. By the way, this is another plus point of the Satoriqe 1 . Her reproduction is free of any showmanship. Everything is clearly structured. No area is emphasized. As a result, you never get the feeling that it's too loud. As you may have noticed, I am not a high-ender or a classical music lover. Patricia Kaas has a live CD ("Ce Sera Nous"), CD 2 is symphonic. So classical music is also made palatable to me. Why? Because I can hear how the musicians play. Does someone pluck his violin or stroke it with his bow? I can understand that now.
Video: Katie Melua - Two Bare Feet
My conclusion:
The Satorique 1 is a speaker for the discerning listener. Those who want to hear the subtleties in their record collection can access here.
Satorique 1 Rd
Report form Ilgner
I came across this incredible little loudspeaker while listening to it in Kerpen.
I was comparing the Satorique3Be with the "Eton Duett" when in between times the Satorique 1Rd was demonstrated to me. In disbelief I listened to what came out of this shelf speaker. From the SB classic I have already built 2 times and know how good even smaller speakers can sound. But I would not have expected this. I must have had to get up 3-4 times from my listening position and sneaked around the speakers to make sure only the Satorique1Rd was plugged in.
So after building the Satorique3Be for the living room, I needed something in the bedroom. There hangs a screen together with a beamer. Until then, the sound was provided by a Teufel Motiv 2. My omnidirectional speakers, which I still had, were too high and protruded too far into the picture. The S1Rd on small stands would be perfect. Ok, so on to the next project.
I ordered the kit, got the blueprint sent to me, and I was ready to go. After thinking about how to build the boxes, I made the wood list and ordered the cut from an internet store.
First came the front. The cutouts for the chassis were drawn and then the cutouts were screwed to a base. This prevents the router from slipping once you are done with the circle. First came the front. The cutouts for the chassis were drawn and then the cutouts were screwed to a pad. This prevents the router from slipping once you are done with the circle.
Then the holes in the bracing in the box and on the back side the hole for the bass reflex tube had to be milled out. The rest of the cutouts were drawn and then the jigsaw was used.
Then it was time for gluing. I found this to be the biggest challenge. Due to the complex bracing and the screw-in back panel, I was a little apprehensive. The result confirmed my fears.
Well, what the heck, I had to grind anyway. The coarse disc on the random orbit sander and off I went. I was again very satisfied with the result.
Then it was time for the contours. I drew a few guide lines, roughed out the edges with a 45-degree router and shaped the rest with the random orbital sander and sanding pads by hand. Looks really good already.
I liked the spackled housings as I saw them in Kerpen and wanted to try to imitate that. For this I had to prime the MDF, which still worked well, and mix a gray putty. But somehow I took way too much paint and the mass became too thin. With a spatula there was nothing more to want. But the color was exactly as I wanted it and therefore the mass was then applied with a brush. 2 layers.
The result looks different than I originally wanted, but I still liked it somehow. Looks and feels different. Then the box had to be lined inside with Vibrodamping (a kind of Alubutyl). So that the stuff holds better on the untreated MDF walls, it was coated with Pattex "glue instead of drilling".
The 2-part crossover was attached, the cables laid and soldered to the terminals. The necessary Sonofil stuffed in and the rear panel could be screwed on it. Due to the filler, the cutouts for the chassis were a bit too narrow and I had to use the sander. This resulted in some white spots around the chassis. But I was able to repair them afterwards with paint and a thin brush.
Ready they were. They are connected to a Yamaha A-S501 with more than sufficient power. Thus, the whole house can be sounded without any problems. As a player serves a laptop which is connected via a USB DAC (HIRESFI USB DAC 5122A) analog with the amplifier. For movies, the laptop is also connected to the projector via HDMI.
Now about the sound:
I am always amazed at how much bass comes out of the small speakers. It's really fun to watch movies with them, even without a subwoofer. Like the entire Satori series from SB Acoustics, they resolve extremely well, play very precisely and still create enormous levels. They form a very good stage, which always fits the picture, music or sounds detach wonderfully from the speaker and fill the room. For me, the Satorique1Rd are unbeatable in terms of price-performance ratio and can only recommend them.
Thanks to the team of Satorique for this great speaker kit!
It pays off! ... to build a Satorique 1 BE
Report from Reiner
After a short telephone consultation (Kerpen is unfortunately too far away from Vienna) from Mr. Nötzel I decided on the Satorique 1BE, because I unfortunately have no space for a larger box. The quickly delivered complete kit was very easy to assemble thanks to the precise prefabrication.
The design I chose was then actually the more complicated, but ironing on the veneer sheets with white glue then went quite well, the front was sanded, filled, primed and then painted black matte 2x. The stands are also self-built, since I have the challenge 2 different heights, thereby the speakers are on precisely matched Sylomer discs for decoupling.
About the sound:
Yes it's true what others write here, from this compact speaker comes out a sound that you do not expect so - crisp, tight, amazingly deep bass and very finely resolved treble, especially in classical pieces, the violins are a pleasure, but also in the jazz area, the Satorique 1 knows how to convince!
The Sylomer damping elements decouple perfectly, although the right LS is not on the ground.
Now I will build the small Satorique Petit for my study and then we'll see...
Greeting Reiner
Markus' S1 Be
After watching some videos in the YouTube DIY bubble, I decided to look for some building suggestions. One of the reasons was that you can certainly save some money if you want to get into the high-end regions. My existing Monitor Audio Gold 300 GX already play so well - an improvement through "ready-made boxes" is rather expensive.Among the better kits I came across the Satorique series and after some hesitation decided to buy them - the rather high price of 1000€/speaker deterred me as a newcomer.
But after a nice phone call with Mr. Nötzel it was clear - I wanted to get started and ordered... It was going to be the beryllium version of the "shelf speaker".
I ordered more or less the complete programme - including a milled front in birch.
Unpacking
After the seemingly endless waiting time (ordered before Christmas), the delivery finally arrived. Three large parcels arrived. Super carefully packed. Largely with cardboard as filling material - very good. Unpacked, the two boxes with the two speaker parts and one box with general accessories came to light.
The assembly
The wooden parts arrived nicely packed:
After a rough check if everything fits, laying down the individual wooden parts, the gluing could begin.
That went quite well so far. The only thing that was a bit tricky was the inner bracing, which is not really fixed correctly by milling. Otherwise, the carcase is well fixed by the wooden dowels and can't really slip.
I had organised some tension straps and corner clamps as well as quick clamps beforehand:

Painting the front
I decided to keep the structure and colour of the birch wood front and just apply a satin varnish.This worked quite well with a roller and a bit of sanding in between. But I must have applied 8 coats... So it took a little while. I used an Adler Aquaacryl CFB lacquer.
Between the painting sessions I always packed the roller in a freshness bag - then you don't have to wash it out and saturate it again with varnish...


The foiling
With a heavy heart I decided to foil the cabinet instead of painting it. Due to space constraints, it is rather difficult to try to achieve a piano lacquer surface with acrylic lacquers in the winter indoors.Therefore, the decision was made to use a 3M film.
A first test with the back wall was quite successful.

After another good hour, the first loudspeaker was finished:

Certainly not perfect - the film is also relatively "tough" and is difficult to deform. It is also a furniture film that is not so easy to bring around contours. Here you have to cut. But this is not a problem with such a rectangular box.
The front can go on
After the foiling and painting was finished, I could glue on the front.
Since there were no slots for dowels in the front, it was a bit tricky to get the position right. I didn't get it 100% right either. Well - next time. But nobody sees it anyway.
Switch assembly
The next step is to mount the two monstrous crossovers.One crossover goes into the bottom panel of the cabinet, the tweeter crossover into the rear panel.
Here are the crossovers in their glory once again:

The installation on the back seat was relatively easy - except for the missing holes. The only thing missing was a few instructions on how exactly to place them. It's important to have only about 1mm of play - otherwise the lid won't close...
But after a bit of trial and error and measuring, I was able to put the holes in the right place:

The terminals were self-explanatory.
The second switch was a bit easier to place, because here the distances were not quite as critical and you are not "in the way" anywhere. Fortunately, my small cordless screwdriver just fitted into the housing to get the screws in. With my hand it would have been a bit difficult.
Connecting the drivers
Finally, the drivers can be connected and all the cable stuff can be soldered.I found the soldering a bit annoying - I probably need different solder - the wires didn't really want to stay on the terminals and on the drivers. Tinning was difficult. You might need some "coarser" solder - I only had very fine electronic solder. A separate flux was not available. It's easier with that. I mounted the second speaker by crimping. This works great - but will probably be criticised by the purists.
Here is the great woofer and the even better beryllium tweeter:

Almost finished:

First test
So, I disconnected the "old" ones and started a short test listening to see if the investment wasn't wasted:
REW was also quite usable. Here only a sweep in the lower frequency band (with and without subwoofer):


Impressions
In the meantime I got some stands and the screws are in:


Conclusion
All in all, the building experience was ok. Everything worked - even though I'm not a great woodworker. But I probably won't be able to achieve 100% perfection like with €5,000 off-the-shelf speakers. If you are good at varnishing and have a suitable workshop - or if you don't necessarily need a piano lacquer finish, you should go for this option. Foiling was easy - but also not cheap (the foil also cost 150€ with 2m^2).Sound
In terms of sound, the "little ones" can easily hold their own against the Monitor Audio floorstanding speakers. Maybe the floorstanding speakers could produce a bit more power in the lower range - but with the subwoofer, there wasn't much difference between the two. After all, the Monitor Audio were already around 2500€ per speaker...And now?
Next will be a centre speaker from the Satorique range, once the MA floorstanding and centre speakers are sold.
As amplifier I want to relieve the power amplifier of my Denon X4400 and put two Apollon Class D monoblocks. They should then be able to play the fronts without restriction - whether it will be of any use - I don't know.
The rear speakers are currently KEF floorstanding speakers - I'm sure a Petite or something can go there. We'll see.
I would also like to install height speakers for Atmos - but the parts shouldn't be too huge. Maybe I'll find something suitable for that. Not urgently, as there is little good content for Atmos anyway.
Always something to do

In my study I was still missing music in pleasant sound quality. In my search for suitable (and affordable) loudspeakers, I came across Satorique and DIY, and stuck with the S1.
As a guitar maker, it was an exciting task to build a hollow body according to the opposite principles of instrument making:
- instead of using the thinnest possible woods with hard special glues, gluing thick MDF boards with elastic white glue.
- internal constructions that prevent cabinet vibrations instead of supporting them.
From instrument building practice, I automatically thought of rather oval cabinets, which also takes the peaks out of the natural resonances of the air space. Add to that a sloping top and the whole thing also looks good.
The side walls have a multi-layer construction with slotted MDF, cork, slotted MDF and on the outside - for both optical and acoustic reasons - a bamboo veneer.
All the edges of the interior are rounded, because sharp edges create eddies that may be noticeable as noise (probably inaudible, but while I'm at it).

After gluing, the saw slots were filled with fine sand to increase the damping of the cabinet (about 1.5 kg per speaker went in).
After consulting with Mr. Nötzel as to whether this geometry would work sound-wise and whether the bass reflex port could also point (it can and together with a bass reflex tube flared on both sides the whole thing sounds excellent), after many hours of cutting, bending, gluing, bending, gluing, it then looked like this:

Here in detail the layered construction, the inner MDF layer is just a triangular profile that widens the gluing surface of the front:

Since the layered construction with the cork is elastic, decoupled bushings had to be placed for the connections:

The finished cabinet ready for gluing on the front. The glued surfaces are covered with cork, the inner surfaces are glued with bitumen and the bass reflex hole is drilled.

The wood for the fronts made of 30 mm poplar wood.

Finished front except for the top and bottom phases.

As the depth of the tweeter is less than the thickness of the front, the tweeter cut-out was covered with cork and MDF to reinforce the front.

View into the speaker ready for installation, only the bass reflex tube is not plugged in yet:

After installing the speakers and putting on a speaker cover:

And then the first listening test with Johann Sebastian Bach and the Partitas for solo violin. The violin is clearly audible, the treble is clearly present without being exhausting, one listens to the sound of the bow stroke. And also the middle registers are in the room.
Then a cello concerto by Shostakovich. The solo instrument is pleasant from the basses to the somewhat scratchy cello trebles, the double basses in the background rumble subliminally.
It's fun to listen to music with these speakers, especially with "difficult" instruments like viola da gamba, which often become tiring after a short time.
Unfortunately, one problem arose with them, they still stand in the living room, as they sound a class better than my rather expensive boxes there. And I don't want to run them with a simple amplifier either. So there is still nothing in the study.
Many thanks to Mr. Nötzel for his advice on my many questions. The result always gives me pleasure.